|
|
Post by Nick the man with a daf.... on Feb 23, 2011 20:00:17 GMT
that princess makes even Bert look like a goodun......
(and Bert is rusty as the titanics bottom)
|
|
spunkymonkey
Likes DAFs
Currently waltzing Matilda
Posts: 3,482
|
Post by spunkymonkey on Feb 23, 2011 22:31:28 GMT
Rust, what's that? ;D Having decided to risk complete collapse without warning due to her compromised structure, I carried on with cleaning and prepping today. What's been done is pretty self-evident so I'll mostly let the pics do the talking for a change:    The next one may not be all that clear - the edges of the glued-down soundproofing have been saturated with rust treatment to (hopefully) counteract any time they've spent saturated with water in the past   Centre exhaust mounts (bolt on type - I like that sort of detail  )  And, finally, the passenger side given a spray of Dinitrol. It's their cavity wax rather than "proper" underbody because that's what I've got available but it should protect well while it lasts and is a good base for a spray of underbody at a later date. Plus, I reckon it keeps her looking nice and clean under there compared to "traditional" bitumen gunge everywhere: 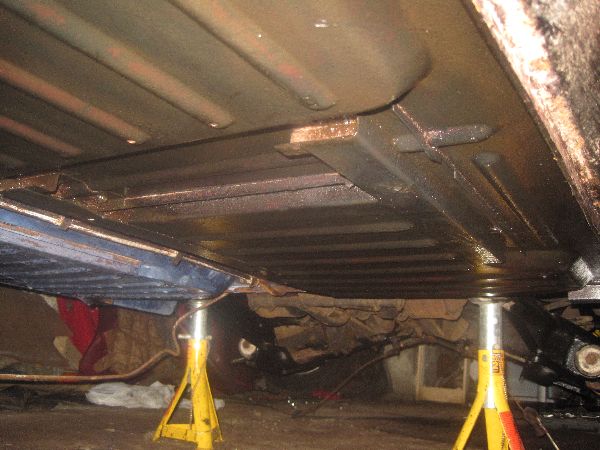 |
|
kenr
Likes DAFs
Vee the 33
Posts: 734
|
Post by kenr on Feb 24, 2011 0:01:22 GMT
Meant to say that I actually enjoy that bit Joe. Gives me great satisfaction to get into every nook and cranny and clean it out. Sad, I know  |
|
spunkymonkey
Likes DAFs
Currently waltzing Matilda
Posts: 3,482
|
Post by spunkymonkey on Feb 25, 2011 21:37:57 GMT
Thanks, JOhn, I hope we'll get her to a condition worthy of her badges Meanwhile, the only update is that there are no updates. Yesterday was spent doing pre-MOT (and urgent road safety) repairs to Isabel, who now needs 2 bits of welding and thorough cleaning (so the tester doesn't contract foot & mouth from all the horse related gunge in her  ) before hopefully earning another 12 month reprieve from recycling. Today started with a 6:30 AM start to drive a 7 1/2 tonner down to Coventry and collect a Standard Vanguard 6 plus many, many spares on behalf of the guy who owns our workshop. Having got home just before 7 this evening, I'm afraid I was just too lazy to go down and do any Daffing. Must try harder in future........  |
|
spunkymonkey
Likes DAFs
Currently waltzing Matilda
Posts: 3,482
|
Post by spunkymonkey on Feb 26, 2011 21:10:30 GMT
Permission requested to make up for yesterday's non-update with an update: Started off today by getting the rest of the underside waxed. This included going round the rear suspension arms and all the box section bits with an extension tube and emptying large quantities of Dinitrol inside them. Couldn't get photos on the insides, but the visible bits now look like this:    Then it was out with the battery tray and the voltage regulator. Also popped the top off the regulator to confirm it was still nicely sealed - it was, but no pics of that I'm afraid. Both got treated to some nice black paint (you can't beat the stuff )   As did the other rear brake backplate and the brake balance valve:   The next plan was to start clearing the rest of the engine bay ready for some paint, and to free up the seized vacuum valve. This meant finally attacking a bit that I know Pete's been waiting a long time for - removal of the under-dash shelf!! Now, this is a very technical operation, Pete, so you may want to pay attention and (maybe) take notes. The shelf is held in place by brackets with a single screw at each end (pretty sure on Betty it's a small bolt, but same idea):  And, err, that's it ;D The rest of the support is provided by it resting on the wheel arch and the air mixer box. So undo the two screws and pull:  With that out of the way, the cable for the vacuum valve had to be undone and unclipped from it's support on the bulkhead so it could be pulled out of the way:  Which allows the soundproofing to be gently pulled back:  to reveal the two screws holding the vacuum valve:  Having loosened these, they can be removed by reaching through the big hole you made earlier in the bulkhead, so you can catch the valve when they come out:  I'll cover the stripping of the valve in a future issue but, for now, the engine bay is down to this:  Next steps are to reassemble the back end and brake plumbing as far as the joint below the floor, then move the axle stands to the front and remove front brakes, suspension and the steering rack. With a little masking of wires, the engine bay will then be ready for cleaning and paint - which has to be done before the vac valve and master cylinder go in to complete the brakes. So there could be some spray action in the next few days....... |
|
33grinder
Likes DAFs
CHPD* sufferer (*Compulsive Heap Purchasing Disorder)
Posts: 2,905
|
Post by 33grinder on Feb 26, 2011 21:43:11 GMT
Excellent stuff Joe!
Some great progress there and nice to see the quality engineering used to attach the parcel shelf! ;D
Right, I'm off to Homebase...
|
|
spunkymonkey
Likes DAFs
Currently waltzing Matilda
Posts: 3,482
|
Post by spunkymonkey on Feb 27, 2011 20:21:12 GMT
OK, was hoping to make some major progress today but that got spoilt by a d**n supplier's mistake So, instead, I'm going to show you a bit of improvisation that should really not be tried at home (or, probably, anywhere else for that matter ) You may remember that I'd ordered 4 new flexi hoses from Rimmers, which were listed for the Rover SD1 and on clearance at a very reasonable £2.95 each. Before ordering, I emailed them for details of the length and end fittings and they confirmed length of 30cm and 3/8 UNF ends. Perfect! Only, when I went to fit one today, it didn't want to screw in. A quick look at the fitting confirmed that it wasn't gonna go....  Yes, those 3/8 UNF ends are metric!!!!! I have no idea if the email was in error and they should be metric, or if they're on clearance because they were made up with the wrong ends, but it doesn't really matter - either way, they don't fit. At least, they didn't fit. Those of a nervous disposition may like to look away now. You see, thinking back a long time to when I did engineeringy things for a living, I had a vague recollection that 3/8 UNF and 10 x 1 mm threads are very close indeed. The major diameter of the UNF is 9.525mm instead of 10mm but the thread form is the same and even the pitch is very close (24 tpi UNF, 25.4 tpi metric). Over the length that the female nut screws on to a fexi (about 1/4 inch) that's about 1/4 of a thread difference. The question was, given the smaller diameter for imperial, could you re-cut a clean UNF thread over a metric one? Would that 1/4 thread remain in the metal of the original thread form? There was only one way to find out. The pipes were no use to me as they were, so in the lathe and take an end down to the smaller diameter of the UNF thread:   That 0.4mm removed almost all of the metric thread, leaving a good chance ofa UNF fitting in what was left:  A little careful work with a 3/8 die - being very careful to start the new thread in phase with the old one - led to an almost perfect unf flexi:  I say almost perfect because (a) a cut thread is never quite as clean as the rolled thread they put on them in the factory and (b) it started to lose it's crown in the last 4 threads before the hex. But that's well outside where the union fits so no worries there. End result was I did get to re-plumb the back end:  including getting the main front-rear pipe back in (that was a fiddly job!):  But didn't get to finish the n/s backplate or get the tank back in. Which meant I didn't get to remove the front suspension or the steering rack or start cleaning the engine bay. Which is what I'd hoped to be announcing by now |
|
spunkymonkey
Likes DAFs
Currently waltzing Matilda
Posts: 3,482
|
Post by spunkymonkey on Feb 27, 2011 23:20:34 GMT
Yep, perfectly legal John - in fact, they're the preferred option. Copper pipes really aren't a problem - bad fitting of copper pipes (over-working bends and flares or not supporting well enough) is!
|
|
spunkymonkey
Likes DAFs
Currently waltzing Matilda
Posts: 3,482
|
Post by spunkymonkey on Mar 2, 2011 18:59:53 GMT
Not many photos over the past few days, but that doesn't mean there hasn't been progress. Yesterday saw the handbrake linkage being stripped and cleaned so that the back brakes could go back together: 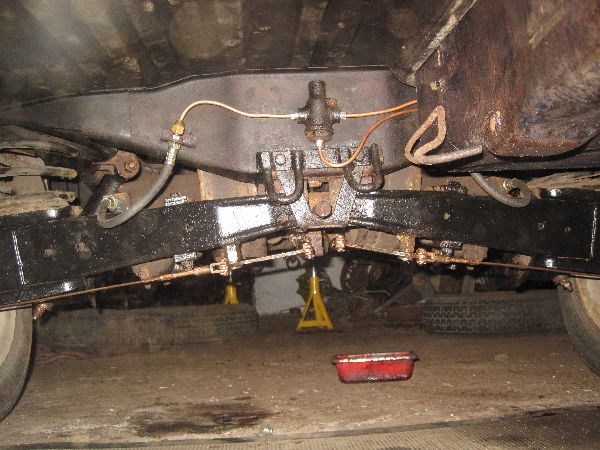 and the back wheels back on the floor:  That freed up the axle stands to move to the front so that I could start stripping them:  Only I really wasn't in the mood to clean up more rusty suspension today so, having removed the struts and steering rack, I put them to one side and got on with something a little more visually productive. Some time ago I posted this photo of the engine bay: 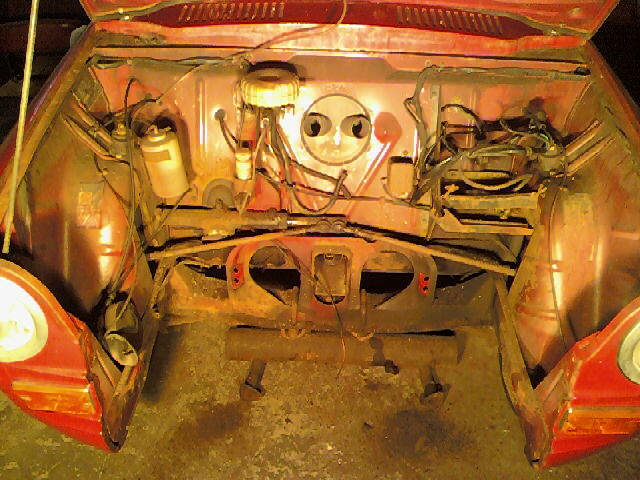 Today that photo became this, with everything stripped out and a little test scrubbing of part of the bulkhead: 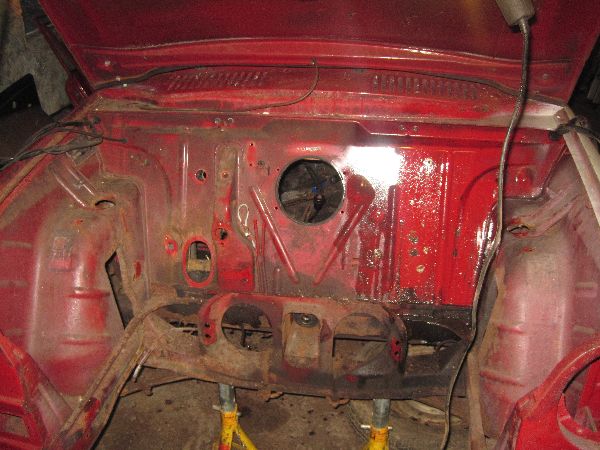 The plan was to stop for the evening having stripped everything out but, seeing the effect of a bit of thinners on a rag, I got the spray kit out and treated the bay to about a litre of finest cheapo thinners worked in with a washing up brush. Apart from making me feel a little high ( ) the effect was pretty startling - an awful lot of the apparently rusty stuff turned out to be rust coloured dirt!  It's still going to need a fair bit more cleaning and prep before any paint goes near it but it's a whole lot better than I'd expected - especially around the bottom of the bulkhead / engine mounts / spring box area |
|
33grinder
Likes DAFs
CHPD* sufferer (*Compulsive Heap Purchasing Disorder)
Posts: 2,905
|
Post by 33grinder on Mar 2, 2011 22:08:53 GMT
Top banana Joe! You've had a right touch there with the engine bay - result!  |
|
spunkymonkey
Likes DAFs
Currently waltzing Matilda
Posts: 3,482
|
Post by spunkymonkey on Mar 3, 2011 18:27:21 GMT
Guess it's time for an update (it has been nearly 24 hours!) Received confirmation that she's what we said she is from Steve Bidwell today, so hopefully a quick trip into the Bangor DVLA office should get her paperwork sorted without too much trouble now. Using that as an excuse to keep moving with her, I put my desperately pending (due on the 8th) OU assignment to one side this afternoon and went to attack some under bonnet rusty bits. The plan was to get them ground back and rust treated, something like this: 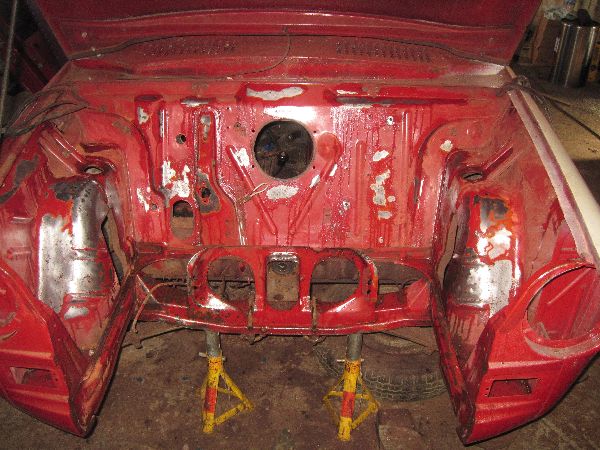 Only, she looked so sad like that I decided to have a coffee while the converter did it's job and then scrub her down with Marine Clean (horribly caustic cleaner that will actually dissolve the surface of 40 year old paint!) and give another spray down of thinners. Obviously, that left her a little wet so I borrowed the landlord's halogen work lights to help dry her off:  Only, doing that left the metal pleasantly warm and it seemed a waste not to take advantage of that to get some etch primer over the bare bits:  That left her looking like Spot the Dog so, not wanting the other cars to make fun of her, the etch got a blast of drying lights followed by a couple of coats of normal primer to tidy everything up: 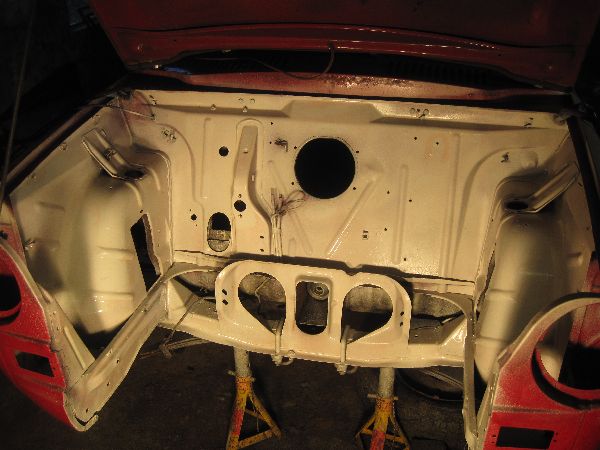 The thing is, having gone to the trouble of breaking out the spray gun and set everything up, it seemed pointless putting it all way without using up the 100ml test pot of paint. I'd already decided that I'd use that for the under bonnet stuff because it was mixed separately from the main batch and any slight mis-match wouldn't matter round the engine. So by the time I left she was looking like this: 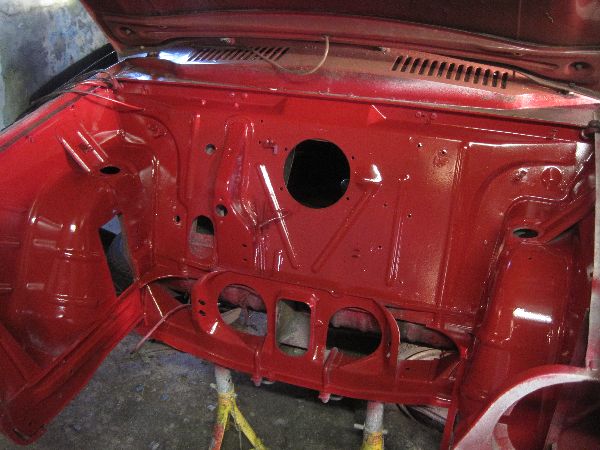 It's by no means a perfect finish, and the prep was a little shoddy in some of the awkward corners, but for about 3 hours steady work with 100ml of paint and "standard" thinners I reckon it'll do for an engine bay ;D  |
|
stefan
Likes DAFs
If it isn't broken fix it till it is
Posts: 1,282
|
Post by stefan on Mar 3, 2011 19:10:18 GMT
Looking good Joe
|
|
33grinder
Likes DAFs
CHPD* sufferer (*Compulsive Heap Purchasing Disorder)
Posts: 2,905
|
Post by 33grinder on Mar 3, 2011 20:17:11 GMT
A blind man would be pleased to see that! Well done Joe, I can't keep up with all these updates. I just cannot live without my daily Matilda update!! |
|
spunkymonkey
Likes DAFs
Currently waltzing Matilda
Posts: 3,482
|
Post by spunkymonkey on Mar 3, 2011 20:42:26 GMT
Sorry, Mac, it'll be a few days for the next one. I've got to tackle this assignment and I'm going to use it as paint hardening time to give the new stuff a chance to toughen up for a few days before messing round with pipes near it.
|
|
spunkymonkey
Likes DAFs
Currently waltzing Matilda
Posts: 3,482
|
Post by spunkymonkey on Mar 7, 2011 14:01:14 GMT
Grrrrrrrr.
Having confirmed online that DVLA have no record of 'Tilly and jumped through hoops to get the relevant evidence (including imposing a 350 mile trip on Steve B!) I've just been down to the local DVLA office and they have got a record. Only, it's been voided because it's been inactive for so long so it doesn't show up on an online enquiry!
So we have to send in a "normal" V5 application (with yet another £25) and they'll then "investigate" and get back to us. Why are things never simple???
|
|
|
|
Post by Nick the man with a daf.... on Mar 7, 2011 18:31:33 GMT
cause its the DVLA..... simple as..
|
|
stefan
Likes DAFs
If it isn't broken fix it till it is
Posts: 1,282
|
Post by stefan on Mar 7, 2011 18:43:58 GMT
I can only agree with Nick
|
|
spunkymonkey
Likes DAFs
Currently waltzing Matilda
Posts: 3,482
|
Post by spunkymonkey on Mar 7, 2011 19:08:25 GMT
Well, at this rate getting the V5 is going to have cost as much as getting her roadworthy  |
|
spunkymonkey
Likes DAFs
Currently waltzing Matilda
Posts: 3,482
|
Post by spunkymonkey on Mar 7, 2011 21:27:06 GMT
After the paperwork annoyance I decided to pop down and take a bit of my frustration out on some spanners. First job was to get all her wheels off. We have 6 tyres on order for tomorrow (4 for Matilda and 2 for Isabel) but I only have 3 axle stands. So Matilda's on 3 stands and her spare at the moment and Isabel will be on Betty's spare in the morning. It threw up a curious thing as I was getting the last wheel off 'Tilly - these cars have an impressively stiff body-shell! This is what happened to the o/s/f stand when I had the n/s front on a stand, the n/s/r on the floor and jacked the o/s/r under the suspension so the wheel was just clear of the ground:  Yep, She can levitate (which reminds me, must get some Dr Hook in the car )! Anyway, once they were off and loaded into the trailer, the front suspension got a quick coat of black paint, which seems to have reacted with the etch primer. Ahh well, no-one will see it underneath It was then on to the front hubs, which now have clean bearings ready to be greased up and put back in - that means all wheel bearings will be original when she goes back on road. The steering rack also got stripped, cleaned, and new bushes (as detailed on my site, so not piccies this time) although I did have a slight annoyance there. Having got down to the last pair of the bushes I made all that time ago, one was too tight. It all went together but was way too stiff to turn so it all came apart again to open the bush out slightly. It's now stiff-ish but smooth so should bed in nicely Then it was on to the vacuum valve. To be honest I'd been dreading this a little bit because, if I found the same rust in there that there's been in the rest of the brake system, then I'd have a problem. I don't imagine they're available off he shelf anywhere! I'd already taken off the plastic reservoir and rotating bit on the bottom so today meant attacking the main body and the pintle valve inside. To so that there's a circlip at the back which has to be removed:  Here there's a bit of a puzzle. Under the circlip is a disk, with a spring underneath that:  Only, looking at the way it works, I'm 99.9% certain that they should be the other way round (plate in first, then spring, then circlip). The reason for that is that the back end of the valve pintle comes through there:  There does seem to be a wear mark on the plate to match the "pip" in the centre of the pintle, which would suggest they were assembled the other way round at some point in their history. When the brakes are applied, that pintle is pressed backwards by fluid pressure but, with the spring under the plate, it'll pass straight through the spring and have nothing to push it forwards again when the brakes are removed. So, as it was assembled, the first time the brakes were used, it would have entered low ratio hold and stayed there. Which would have made Matilda a very revvy Daf last time she drove anywhere! If anyone has first-hand experience with these valve, or a parts breakdown piccy, I'd really appreciate confirmation of my suspicions before reassembling! Anyway, today was about taking apart, so the next thing was to remove the brake union on the nose:  to reveal a fairly unhealthy looking sludge!  The pintle was glued pretty well in place, but nothing a little gentle (yes, it was quite gentle!) persuasion with a brass drift wouldn't cure:   That actually doesn't look as bad as I'd feared. Most of the gunge is semi-dried brake fluid but there's no real sign of rust, which there would be if water from the fluid had got trapped in it. Maybe this being the highest part of the system saved it at the expense of the master and wheel cylinders? It's hard to inspect (and harder to photograph) the bore but it doesn't look too bad:  If it does look dead when it's cleaned up then we have the technology (a lathe) and (courtesy of Mr Poly-bush) the materials to sleeve it in stainless steel so no real worry there. That's the good news for the day to make up for the frustration of the paperwork ;D |
|
33grinder
Likes DAFs
CHPD* sufferer (*Compulsive Heap Purchasing Disorder)
Posts: 2,905
|
Post by 33grinder on Mar 7, 2011 21:47:41 GMT
I'm sorry to hear that Matilda has become embroiled in some DVLA red tape Joe, all to pay the wages of some offitous pen pusher. Still, the last picture says it all: Theres light at the end of the tunnel. What are those rings hanging from the front cross member? Andy's Blue Thunder has those, Gavina doesn't.  Another great report, keep up the good work. |
|
spunkymonkey
Likes DAFs
Currently waltzing Matilda
Posts: 3,482
|
Post by spunkymonkey on Mar 7, 2011 21:51:15 GMT
The rings were mentioned on someone else's car on here many moons ago and John hinted heavily that he knew what they were but refused (or forgot) to tell. My guess is that they're tie-down points for delivery and were probably meant to be removed by the dealer. But that is only a guess |
|
33grinder
Likes DAFs
CHPD* sufferer (*Compulsive Heap Purchasing Disorder)
Posts: 2,905
|
Post by 33grinder on Mar 7, 2011 22:41:03 GMT
I remember seeing Blue Thunder's rings and wondered about removing one for closer inspection bit decided against it as they looked like a pain in the preverberals to remove. Guess the dealers must have cut them off, but how would they have been attached by DAF? Another ship in a bottle conundrum?
|
|
spunkymonkey
Likes DAFs
Currently waltzing Matilda
Posts: 3,482
|
Post by spunkymonkey on Mar 7, 2011 23:07:07 GMT
Afraid it's not that mysterious, Pete. The clamp on the U blots is in two parts - undo the nuts on the U bolts (you can do that with it sitting on its wheels cos the weight will keep the spring in place) and take them off. Then do the nuts up again. About a 5 minute job if it's all nice & clean under there!
|
|
spunkymonkey
Likes DAFs
Currently waltzing Matilda
Posts: 3,482
|
Post by spunkymonkey on Mar 8, 2011 12:17:00 GMT
Thanks for that, Mac. Definitely looks like what appears to be a machined stop in the body is actually a separate moving spring seat. Have to get the hammer out again I guess |
|
spunkymonkey
Likes DAFs
Currently waltzing Matilda
Posts: 3,482
|
Post by spunkymonkey on Mar 8, 2011 23:21:42 GMT
Well, having digested the details of how it should be I had a look today and that separate spring seat thingy isn't there. So it looks like she definitely had someone in there before and would have been a little high-spirited in the revs dept when on the road last! Not to be discouraged, and having all that lovely stainless steel lying around, a few minutes on the lathe (mine, not the big one) produced this:  Which fits between the pintle and spring something like this:  The only reasonably critical dimensions were the outside diameter and the thickness of the "rim", which had to be thin enough for the pintle to extend beyond the spring when the spring is fully compressed and produce a solid stop against the end disk. With a thorough clean-up of the bore it looks like sealing should be ok, so the valve is now reassembled and ready to go back on the car:   The master cylinder is next, which should be fine (Pete has already resealed it) but will get a quick strip and final rinse out with brake fluid cos it's been sitting for a while. That shouldn't take more than 10 mins and then all the brake bits are ready to complete her stopping power! Of course, working brakes require working tyres, so a set of wheels were delivered to the local tyre place at lunchtime for new shoes. They were collected again about 4 o'clock, tubeless and ready to go:  I've also found a local place to get the pipe for her exhaust, so that's just about all the needed parts sourced now |
|
paddydaf
Likes DAFs
Probably now mowing the lawn
Posts: 176
|
Post by paddydaf on Mar 9, 2011 9:02:14 GMT
she's coming together nicely won't be long before she hits Tarmac again...!
|
|
spunkymonkey
Likes DAFs
Currently waltzing Matilda
Posts: 3,482
|
Post by spunkymonkey on Mar 9, 2011 19:25:49 GMT
Thanks, John, but I seem to have caught a bit of Pete's recent luck today (hopefully I've scooped up the last of it for you Pete ) Got the master cylinder reassembled and painted a fetching silver colour and bench-tested it for any obvious leaks using a crimped-off pipe in it's union to seal it. All seemed ok so I refitted it to the car (first bit back under the bonnet!) and tried it with pedal pressure. Everything felt nice and solid so I then fitted the vacuum valve and plumbed the two together. Cue a fairly loud bang and brake fluid peeing out of one of the valve's vacuum connections onto my nice new paintwork Got that mopped up very quickly indeed and hopefully got away without it stripping the paint, but that leaves the problem of what's happened to the valve? Didn't have time to remove it again but the only things I can think of are that either (a) the seal's blown itself apart pretty spectacularly, or (b) the circlip at the back end hadn't seated properly and blew out under pressure, letting the pintle move too far backwards. Even though it would make it firmly "my fault", no prizes for guessing which I hope it is! If it does turn out to be the seal then she may have to be converted to an electric valve for now because I can sleeve the valve body ok but have no idea where to source seals that small suitable for brake fluid. |
|
|
|
Post by dafdaffer on Mar 9, 2011 23:26:30 GMT
if you can find out a seal i have tins of old stock seals, but i have no idea what most of them are for.
|
|
spunkymonkey
Likes DAFs
Currently waltzing Matilda
Posts: 3,482
|
Post by spunkymonkey on Mar 10, 2011 21:43:58 GMT
Cheers, Paul. Hopefully it won't be needed because when I removed the valve again today the circlip and stop plate fell out as I was undoing it. So it looks like the seal is ok and the clip had failed. Unfortunately it has also caused a little bit of paint damage, but it's well hidden between the master cylinder and the steering rack (once that's refitted) so no big drama:  The possibility of it happening again, given that I now know it means complete and sudden loss of brakes, prompted a little light modification. Having refitted the stop plate and clip:  it was time to drill a hole through the valve body behind the clip:  and fit a tube spacer with matching hole:  which is (loosely) split-pinned in place:  and then filed flush to the valve mounting flange:  The split pin is only there to stop the spacer falling out if it's ever removed again and, by making the pin loose, when it's filed it should exactly fill the space between the circlip and the bulkhead. So, if the clip wants to give up again it'll have to punch a 15mm hole through the bodywork in order to go anywhere  With that done, it was time to refit to the car and carry on with the plumbing. As of leaving time she has the under-bonnet stuff done:  The front rigid tubes done:  and the front flexies rethreaded and fitted ready for the cylinders:  Before getting the suspension and brakes on I'm going to have to have another cleaning-break to sort out the slightly peeling underseal and surface rust inside the front wings. I've been putting it off cos it's more nasty, dusty, soul-destroying stuff but it'll be far easier to do before the struts are back in! Incidentally, I've also cured the weep from the top of the master cylinder - it wasn't the reservoir joint at all, Pete - it was a pinhole in the top of the tin can! All sorted now by cutting out the top of her old (very dead) cylinder on the lathe and gluing it over the new one, then screwing the reservoir down on top while it dries:  Of course, until the front cylinders are refitted so it can all be tested there's no guarantee that I haven't just fitted 18 leaky flares and 4 flexis that bow their threads off at the slightest pressure........ ;D |
|
33grinder
Likes DAFs
CHPD* sufferer (*Compulsive Heap Purchasing Disorder)
Posts: 2,905
|
Post by 33grinder on Mar 10, 2011 22:02:43 GMT
Yet more great progress Joe! I'm glad you got to the bottom of the master cylinder conundrum. I had indeed resleeved it but it still wasn't right. We blamed fluid around the rim of the metal casing as a weeping rubber seal. Very frustratingly we put on a good used item and bled the brakes again. Oh, it was from an earlier model so the unions had different threads so we had to change other parts. Still, with the other unit for spares and your engineering inginuity I knew you'd sort it out! Keep up the great work. |
|

 )
)

 ) before hopefully earning another 12 month reprieve from recycling.