spunkymonkey
Likes DAFs
Currently waltzing Matilda
Posts: 3,482
|
Post by spunkymonkey on Mar 11, 2011 21:19:29 GMT
Cheers Pete & John  Just to show it's effective (and looks original), this is how it looked after a night with fluid in it:  Nice and dry like it should be ;D Now, the observant among you may notice that the steering rack seems to be in place in that photo. Today's Tilly Time was spent cleaning and waxing under the front wings, including a very generous dose up in the top rear corners where they traditionally rot out. Hopefully she won't be suffering that fate for a while!  Once that was done, the front struts could be refitted:  And the steering rack:  I'd hoped to have her back on her wheels today so that, after sorting a few bits on Isabel at the weekend, I could come back to her and dive straight in on the bodywork. But when I was fitting the r/h strut I was a little unhappy with the new copper brake pipe to that corner. I'd made it a little long (about 1/2 inch) and had to work a bit to fit it in but, looking at it as I fitted the flexi today, I think I may have creased it very slightly on the last bend. Didn't feel like making up a replacement tonight (and crawling back under to fit it) so came home for food and a beer instead. It's all about priorities, y'know  |
|
spunkymonkey
Likes DAFs
Currently waltzing Matilda
Posts: 3,482
|
Post by spunkymonkey on Mar 12, 2011 20:17:35 GMT
Bit of a frustrating day today, so you're not getting any photos (I'd planned to display her back on her wheels)  The front brakes and hubs were fitted and feel nice and smooth so then it was time to bleed the brakes. Start at n/s/r, about 5 pumps and nice clean bubble-free fluid appears. So far so good, on to the o/s/r for more of the same. Then n/s/f. Seemed to be a lot of bubbles in there seeing as it's a shorter pipe but seemed to come clear after a while. Still no pedal to speak of but still has o/s/f to go. Air. Air. More air...... Go round again and find a few more bubble from the rears, and quite a bit more from the n/s/f. Back to the last one. Air. Air. More air. Clearly there's a pattern developing here. The same thing happened on another circuit so started disconnecting things. The master cylinder is fine (thanks again, Pete!). With a blanked pipe fitted to it's outlet the pedal is absolutely rock solid. Reconnect master to the vac valve and fit the blanked pipe to the valve outlet. A little softer, but still a very firm pedal. Until you release it and press again, when it goes down to the floor! Bypassing the vac valve and quickly bleeding the system gives a working, but quite low, pedal. But the bleeding this time took about 3 minutes to go round the whole car, so there's probably still air in there. Bottom line, the vacuum valve is letting air into the system. Strangely, it doesn't seem to be leaking fluid out, only air in. Best guess is that the seal is on the edge so any fluid pressure will expand it slightly and create a seal, which then fails as the pressure goes and lets air in to be pumped round the rest of the system. So it looks like she may be getting an electric vacuum valve after all |
|
spunkymonkey
Likes DAFs
Currently waltzing Matilda
Posts: 3,482
|
Post by spunkymonkey on Mar 13, 2011 10:32:42 GMT
If she does go electric it'll only be a temporary measure, John. The problem with finding a new seal is it has to be compatible with brake fluids. I can turn up a mould pretty easily and get the poly guy to pour one for me but, reading around various rubber suppliers' info, it seems that most PU resins don't like glycol based fluids very much. Not sure exactly what resin he's using but it looks like it'd be an annual replacement item for safety if I go that way.
Seeing as the problem seems to be air getting sucked in as the seal relaxes rather than fluid getting out when it's energised I'm thinking of trying to modify the piston to take a back-up O ring seal behind the original cup seal. If it works great, if it doesn't then the piston should still take a new seal if I can find one.
In the meantime, she needs to be ready for the road in another 4 weeks or so to give Betty a bit of very well earned TLC so, if a back-up O ring doesn't work, it'll have to be electric for now. Won't be fitting the dash switch if that happens though - not enough big hills round here to need it and it'd at least keep the dash controls looking right until the hydraulic valve is sorted.
|
|
spunkymonkey
Likes DAFs
Currently waltzing Matilda
Posts: 3,482
|
Post by spunkymonkey on Mar 13, 2011 11:56:58 GMT
That's the one, John. The back end doesn't need to be sealed because it's on the vacuum side so the worst you get is a (very slight) air leak into the vacuum pipes. But the front one has full brake line pressure against it - around 500 psi with a heavy prod on the pedal - and will leak fluid into the vacuum pipes, or (worse) air into the brake system if it doesn't seal properly.
|
|
spunkymonkey
Likes DAFs
Currently waltzing Matilda
Posts: 3,482
|
Post by spunkymonkey on Mar 13, 2011 13:13:42 GMT
The only problems with that are that normal O rings are usually nitrile rubber, which isn't too good with brake fluid, and the piston groove is too wide to accept an O ring without a lot of side-play so it's need a new groove machined anyway.
That's why I'm thinking of machining a second groove in the piston and fitting an O ring as a backup seal behind the existing one. That way the cup seal (probably styrene butadiene) should keep brake fluid off the O ring and the O ring should keep air away from the cup seal.
|
|
|
|
Post by Nick the man with a daf.... on Mar 13, 2011 19:03:31 GMT
all clever stuff !!!
|
|
spunkymonkey
Likes DAFs
Currently waltzing Matilda
Posts: 3,482
|
Post by spunkymonkey on Mar 14, 2011 22:27:22 GMT
Having got Isabel out of the workshop by about mid afternoon today, I headed off to our local CES to collect some exhausty stuff for Matilda. She now has 2x 2m lengths of 1 3/8" pipe (in mild steel), 2x 45 degree bends and a single joiner. Should be plenty to sort out a nice simple system but no photos or things till it's done. Meanwhile, I'd also decided to replace the brake pipe that I wasn't totally happy with. The fitting damage is the dent on the bend here:  May have been a little fussy there but if I hadn't re-done it I would have had it nagging in the back of my mind for months! Having returned with the exhaust, I just about had time to play with the vacuum valve again. First step was to grind a lathe tool to the width of the planned O ring and then make a nice new groove behind the existing seal: 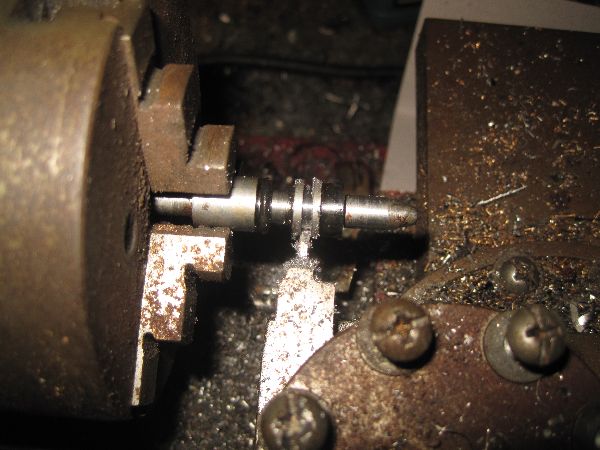 Being careful to get the depth so that the 10mm seal would be stretched very slightly to compress it out into the 10mm bore. The end result gave an outside dameter on the fitted seal of 10.1mm which seemed about right: 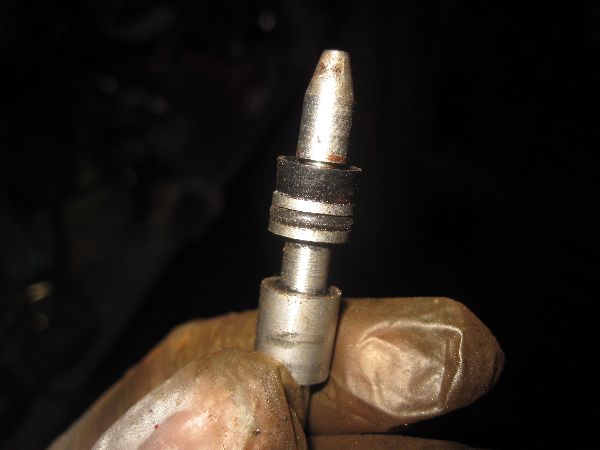 Quite pleased with that even if I do say so myself. Not only does it look like it's meant to be there, IT SEAL!!!!! Plumbed it back in with it's outlet blanked off and there's very slight give in the pedal while the piston moves followed by absolutely rock solid with me virtually standing on the pedal. The driver's seat isn't fitted so I was literally standing, with both hands pulling under the dash to put extra pressure on it - not very scientific but should be a good enough test ;D Incidentally, had a reply from Danny and he doesn't have these seals so it looks like this may be the way to go if it proves durable. |
|
spunkymonkey
Likes DAFs
Currently waltzing Matilda
Posts: 3,482
|
Post by spunkymonkey on Mar 16, 2011 22:33:48 GMT
Moving on to more cheerful news (and one photo) after yesterday, this is the current state of Tilly's engine bay: 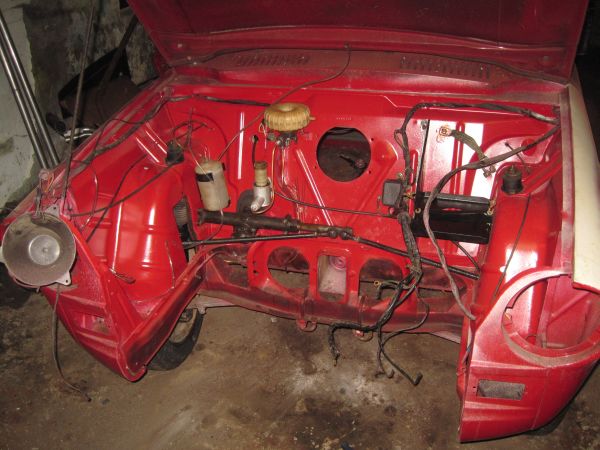 She now has brakes (foot and hand), steering, suspension on all corners and is sitting back on her brand new tyres where she belongs, with fully cleaned and re-greased wheel bearings. Her regulator is refitted and rewired and there's somewhere for her battery to sit. She also has a connected and working speedo (I managed about 25mph spinning the front wheel with the wheel brace ;D ) Her washer pump is trying to work - the valves (neatly built into the T piece in the pipe!) are cleaned and working but the pump itself is struggling a little - I suspect it will be ok if I can get it primed but, if not, hopefully it will be repairable cos it's a spring loaded "pull and release" knob instead of a rubber push-button so I'm guessing it has a proper piston in there. Which should make resealing possible. All that means that I'm now officially at the "bodywork" stage so tomorrow will see doors and glass coming off and, with luck, paint prep started. That always takes longer than expected but it's also kind of addictive and gives visually encouraging progress. So likely to be lots more photos on their way......  |
|
spunkymonkey
Likes DAFs
Currently waltzing Matilda
Posts: 3,482
|
Post by spunkymonkey on Mar 16, 2011 23:23:12 GMT
Yep, we've been really lucky with the basic condition John. It's effectively a big clean-up and cosmetics job as far as the shell's concerned. That's been countered a little by the unexpected mechanical problems but those I can do (even if I do swear at them now & then  ) |
|
33grinder
Likes DAFs
CHPD* sufferer (*Compulsive Heap Purchasing Disorder)
Posts: 2,905
|
Post by 33grinder on Mar 17, 2011 1:06:23 GMT
Excellent work Joe, keep it up! Nice to see her back on her wheels again. Don't forget - when you run out of A bodies to restore we've got a few down here that could do with a visit from Dr DAF! |
|
spunkymonkey
Likes DAFs
Currently waltzing Matilda
Posts: 3,482
|
Post by spunkymonkey on Mar 17, 2011 21:00:56 GMT
And it's started! The passenger rear window came out today. That involves a lot of pop-rivet drilling on these! First you drill the 4 rivets holding the stainless trim on:  And remove the two screws holding the window catch:  and the 4 holding the hinge:  That allows you to lift the window out:  and pull out the seal:  That exposes the lots of rivets holding the aluminium trim / beading strip:  Which get drilled out to remove the beading: 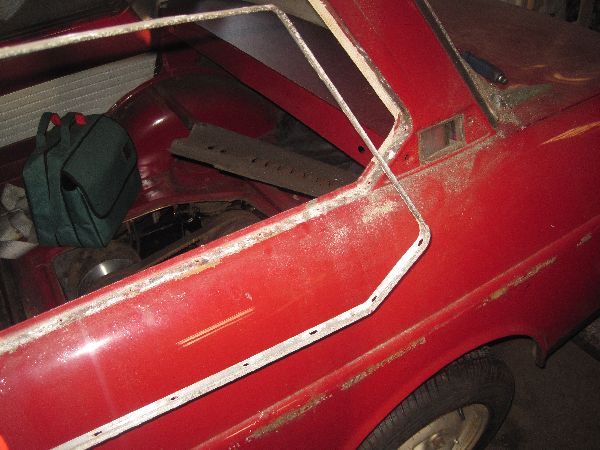 Once that was out, it was time to turn some flap-wheel attention to the bonnet. The obviously nasty corner got it first, and I was pleasantly surprised to find that there was only a very small (about 10mm) hole under all the rust!  Ok, the metal's pretty thin but it's solid enough to provide a good base for a filler skim and the fact it's there at all makes shaping a whole lot easier! Carrying on over the rest of the bubbly bits left it like this: 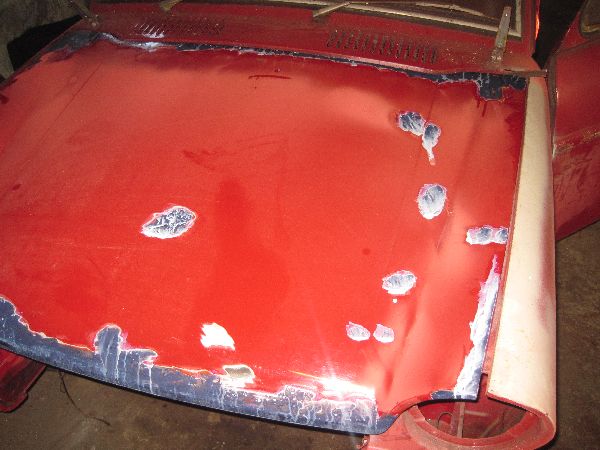 with a nice coat of Kurust overnight ready for feathering, skimming and maybe even keying and priming tomorrow - I really don't like leaving panels bare or primered longer than needed so have to start making an effort now! |
|
spunkymonkey
Likes DAFs
Currently waltzing Matilda
Posts: 3,482
|
Post by spunkymonkey on Mar 17, 2011 23:47:23 GMT
I don't know what you mean, Mac  ;D |
|
kenr
Likes DAFs
Vee the 33
Posts: 734
|
Post by kenr on Mar 18, 2011 0:08:37 GMT
Looks like you're going to win this one unless the exhaust pixie fabricates something on the farm for Snowstrop.
|
|
spunkymonkey
Likes DAFs
Currently waltzing Matilda
Posts: 3,482
|
Post by spunkymonkey on Mar 18, 2011 19:20:03 GMT
Looks like you're going to win this one unless the exhaust pixie fabricates something on the farm for Snowstrop. I'm going to give it my best shot, Ken ;D Started today like I mean to go on, helped by our landlord fishing into a corner and bringing out a DA sander. I've always been just a little sniffy about these as just a lazy way to "save some effort" but I'm now 100% convinced because of the time saving! Started off by going over the bits of the bonnet I'd de-rusted in order to feather the paint edges. That took about 10 minutes: 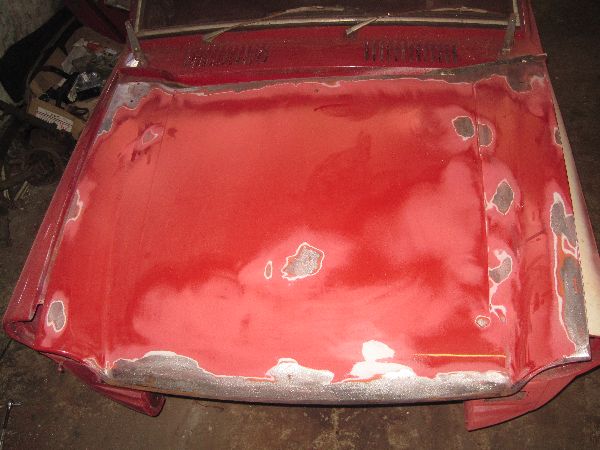 So then I spent another 10 feathering the n/s wing that I'd rust treated before Christmas. There was another side to that which I'd been looking forward to finding out - just how well had the etch primer protected the metal over 3 wet months? The answer was - very well indeed! 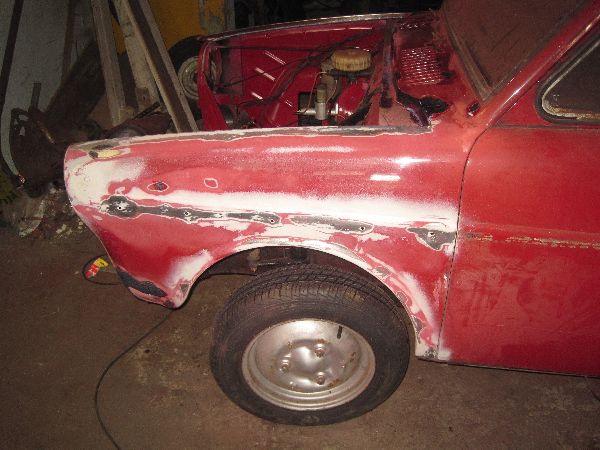 I also found a couple of spots I'd missed so ground them back and rust treated while getting on with the next bit - grinding out any bubbles from the scuttle: 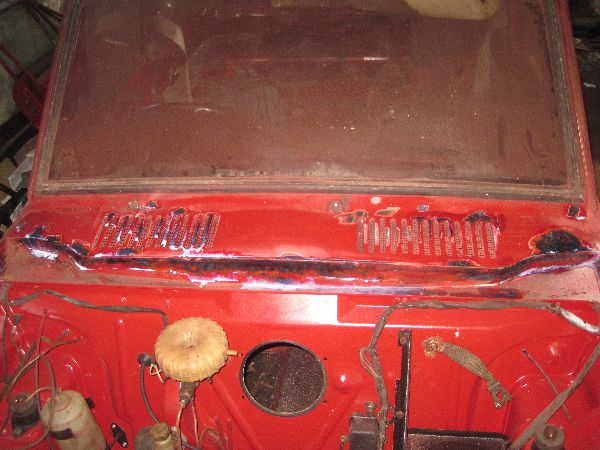 Obviously, that carried on round to the o/s wing which also got ground out and a healthy dose of Kurust:  At this point I decided that I couldn't really do the scuttle justice while the screen was in place, so peeled out the (solid aluminium!) seal trim:  Breath was then firmly held while the screen itself came out:  Which allowed me to remove the fairly sorry looking dash top. Not quite sure what the plan of attack is on this but I'm sure I'll think of something before the screen goes back ;D   There was also the problem of the rear edges of the wings, which you can't really get to with the doors on. So: 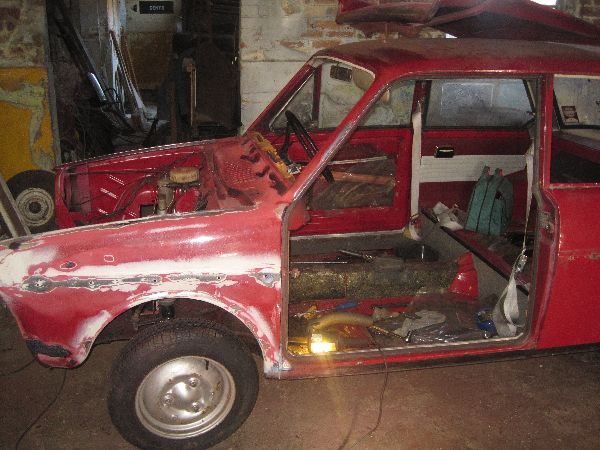 which allowed me to get in to do this: 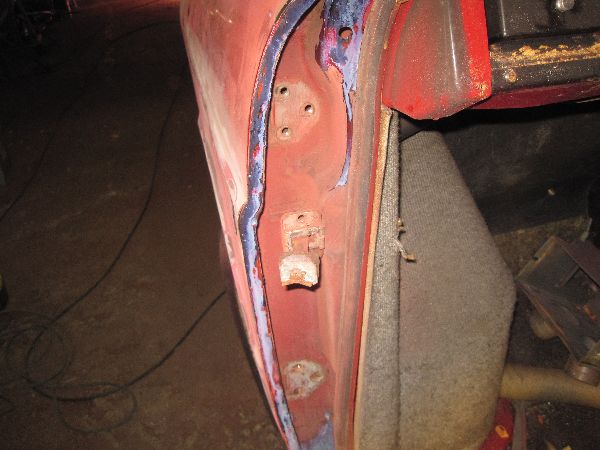 More door removal and DA action followed on the o/s and around the screen surround: 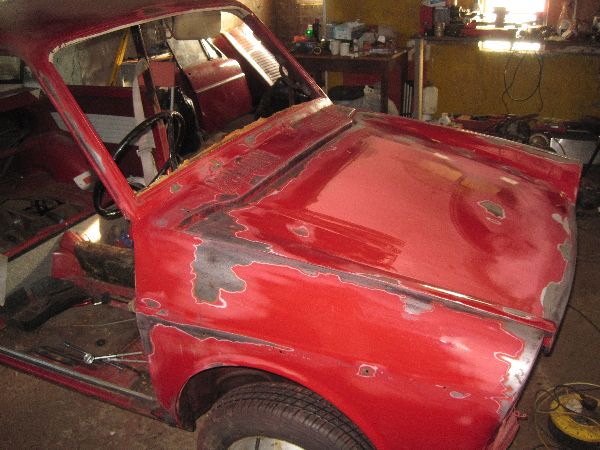 And a skim fill was applied to the areas of the bonnet that needed it: 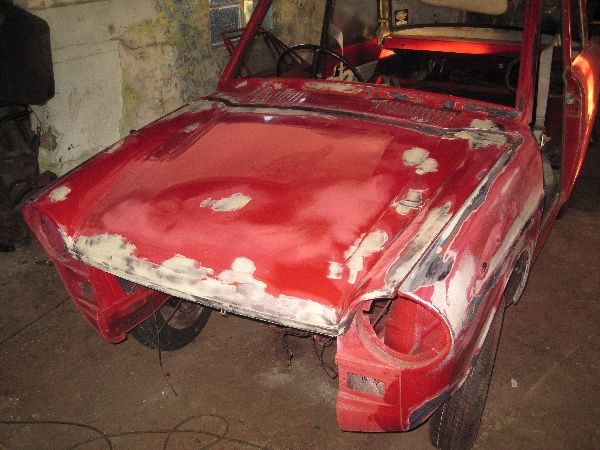 That was all for today, with the filler hardening overnight, but I don't think it's bad progress for about 3 hours. Hopefully by tomorrow she'll be primed as far as the bulkhead - about 1/3 of her done in 2 days if I'm successful |
|
33grinder
Likes DAFs
CHPD* sufferer (*Compulsive Heap Purchasing Disorder)
Posts: 2,905
|
Post by 33grinder on Mar 18, 2011 21:56:09 GMT
At the risk of sounding a sycophant yet again, well done, keep up the good work! I really an jealous; just wish I had the time, the space, the equipment (and ability to use it all), the knowledge...  |
|
spunkymonkey
Likes DAFs
Currently waltzing Matilda
Posts: 3,482
|
Post by spunkymonkey on Mar 18, 2011 22:24:18 GMT
Ahh, but I can't decorate to save my life ;D |
|
33grinder
Likes DAFs
CHPD* sufferer (*Compulsive Heap Purchasing Disorder)
Posts: 2,905
|
Post by 33grinder on Mar 18, 2011 23:21:15 GMT
Ahh, but I can't decorate to save my life ;D Neither can I!!! ;D I know which I'd rather be doing... |
|
kenr
Likes DAFs
Vee the 33
Posts: 734
|
Post by kenr on Mar 18, 2011 23:46:36 GMT
Decorating..... yuck! 'Tis the devils work!
|
|
spunkymonkey
Likes DAFs
Currently waltzing Matilda
Posts: 3,482
|
Post by spunkymonkey on Mar 19, 2011 17:51:58 GMT
Didn't get as far as I'd hoped today thanks to some more filling discovered on the bonnet. There was an area of old filler which has suffered a slight paint reaction, leaving small (about 1mm) holes appearing when I started to block sand it today. There was nothing for it but to rip it back and start again  Because there was nothing more to do there while the filler set, I carried on down the n/s with my last flap disc and a bottle of Kurust until the disc ran out of sandy bits. Just about got down to the boot, including round the door shut and the back window aperture:  At this point, having run out of abrasives (and missed the local hardware shop), all I could do was etch prime the bits of the front wing that were ready and leave the assorted filler / chemicals / paint to do their job overnight. Meanwhile (and slightly off-topic), Isabel seems to have found a corner to hide in, presumably in the hope that I won't find her until I've had a change of heart over her fate ......  |
|
pauldaf44
Likes DAFs
Totally addicted to quirky tat
Posts: 2,068
|
Post by pauldaf44 on Mar 19, 2011 20:13:51 GMT
Meanwhile (and slightly off-topic), Isabel seems to have found a corner to hide in, presumably in the hope that I won't find her until I've had a change of heart over her fate ...... Doesn't Isabel look innocent there. She working on the puppy dog look so you cant stay cross with her and decide to patch her up |
|
spunkymonkey
Likes DAFs
Currently waltzing Matilda
Posts: 3,482
|
Post by spunkymonkey on Mar 19, 2011 20:17:38 GMT
She's trying.....
|
|
|
|
Post by Patrick on Mar 19, 2011 23:10:51 GMT
That red stain by the wall looks suspicious - she's not been leaping out and savaging unsuspecting passers by has she in revenge? (Or MOT inspectors?)
|
|
pauldaf44
Likes DAFs
Totally addicted to quirky tat
Posts: 2,068
|
Post by pauldaf44 on Mar 20, 2011 9:43:12 GMT
LOL....I didn't notice the red stain on the wall. You could be correct about Isabel (or is it Christene now?). Is anyone in town missing? ;D ;D ;D John NO NO NO Petes rover is christene not isabel. Watch yourself Mr Grinder Rover is only feigning injury so she can attack unsuspecting welshmen ;D ;D |
|
kenr
Likes DAFs
Vee the 33
Posts: 734
|
Post by kenr on Mar 20, 2011 15:35:55 GMT
Could have sworn she was moving forward in that picture. I'm scared.
|
|
spunkymonkey
Likes DAFs
Currently waltzing Matilda
Posts: 3,482
|
Post by spunkymonkey on Mar 20, 2011 20:07:22 GMT
Don't say that, Ken, I had the same feeling down there today. Could've sworn a heard a 2-cyl revving a few times as I was playing with Matilda as well  The weather's stubbornly refusing to turn properly spring-like here - we're still struggling to get into double figures and overnight is still dropping close to freezing regularly. It also decided to rain last night, with mist through today. Still, that doesn't interfere with prep work so - armed with some more abrasives - work progressed today with hand flatting the filler on the bonnet and getting a coat of etch primer on:  While that was drying the front wings also got flatted and etched:   Once the etch was dry there were a few small bits that needed a skim of stopper putty. Once that was applied it was left to harden overnight before fine flatting ready for standard primer. The front at least is actually starting to look like it's getting there!  Couldn't do any more around the front so before calling it a (slightly chilly) day, I got the flap disc and Kurust going on the o/s which ended up looking like this:  So it's now just roof, doors and round the boot to de-rust (guestimate a half day), blend / feather and etch prime the treated bits (another half day if I can find sanding disks for the DA) and we'll be onto primer. I'm starting to get all excited now........ ;D |
|
33grinder
Likes DAFs
CHPD* sufferer (*Compulsive Heap Purchasing Disorder)
Posts: 2,905
|
Post by 33grinder on Mar 20, 2011 22:02:18 GMT
Excellent progress as ever Joe. Do be warned though, we're expecting a visit from Ken soon so the Matilda/Snowdrop battle is still on! I hope you're keeping the workshop doors firmly locked against a wondering Isabelle - we don't want an attack in the style of 'I bought a vampire motorcycle'! ;D |
|
spunkymonkey
Likes DAFs
Currently waltzing Matilda
Posts: 3,482
|
Post by spunkymonkey on Mar 21, 2011 21:30:08 GMT
The doors she knows about are too small for her to get through, Pete, but they're locked anyway to be safe ;D As for the Battle of Snowdrop, I'm currently ignoring everything else (including a looming assignment) to try and keep ahead. I just can't help it - I can almost see the finishing line (at a stretch there could be red paint action by the end of the week!) and it kinda makes it hard to slow down Today I got the rest of the shell de-rusted which just leaves the bootlid and the doors to do. The n/s roofline took a fair bit of digging out (the whole channel is now paint free):  As did the boot:  You may or may not have noticed the lumps of burnt roofing tar that were stuck to various bits of her. They came off today as well - surprisingly easily as it turned out using a sharp scraper and not worrying too much about the paint underneath I also found another hole:  I'm afraid that one will be getting filler rather than steel - it's completely non-structural, very awkward to get at, and just needs to be sealed to stop water getting inside. Exactly what Isopon was designed for I also re-flatted the bonnet and wing filler, then got another coat of etch over them where there was a little rub-through. Given that I was expecting to have to fabricate a new corner for the bonnet, I don't think it's come out bad at all with a filler skim:  Nor did the old filler that I took an accidental gouge out of on the wing:  I finished today by taking the Daf Factory Issue parking dent in the rear bumper (why do they all seem to have this one?  )  And hammering it back into something like the shape it was meant to be. It's certainly not perfect but it doesn't hit you in the face like an insurance claim any more:  So now the plan is doors and boot lid tomorrow, followed by feathering and etch priming on Wednesday after the Kurust has worked overnight, then prime and hand-flatting the whole lot (hopefully by Friday) and, finally some Rolita Red goodness. Sunday is even forcast to be a dry, sunny, 12 degrees at the moment - although I'm not holding my breath on that! |
|
|
|
Post by Richard DAF Webmeister on Mar 21, 2011 22:24:08 GMT
So true re the obligatory dent in the rear bumper, often just off dead centre.
On another note, what sort of rush converter/treatment are you using, out of interest? I'm getting ready for the bit of work I have to do on the Bullet.
|
|
spunkymonkey
Likes DAFs
Currently waltzing Matilda
Posts: 3,482
|
Post by spunkymonkey on Mar 21, 2011 22:50:22 GMT
It's Hammerite Kurust, Richard. I've seen mixed reports of how effective it is long term but I've never had a problem with it as long as the metal hasn't developed pin-holes to let moisture back in from behind. The main idea is to remove as much of the rust as possible and only rely on the converter to kill off any little bits you miss. Also, once it's on there don't leave it too long before over-painting. Ideally no more than a day or so because rust will start to (invisibly) form again pretty quickly once the phosphoric acid in the converter is used up. But you can paint over it in about 3 hours so a pleasant dry Saturday could see it done, with the paint drying overnight ready to enjoy on the Sunday |
|
pauldaf44
Likes DAFs
Totally addicted to quirky tat
Posts: 2,068
|
Post by pauldaf44 on Mar 22, 2011 7:22:18 GMT
Theres a test on rust converters in this months practical classics
|
|
 Just to show it's effective (and looks original), this is how it looked after a night with fluid in it:


 )
)
 ;D
;D


 )
)
