spunkymonkey
Likes DAFs
Currently waltzing Matilda
Posts: 3,482
|
Post by spunkymonkey on Mar 30, 2011 20:09:17 GMT
Got a pair on a certain spares car, thanks Pete  |
|
spunkymonkey
Likes DAFs
Currently waltzing Matilda
Posts: 3,482
|
Post by spunkymonkey on Mar 31, 2011 18:24:59 GMT
Took the easy way out with that fuel sender today and did a crafty swap, so the electrics are now done apart from the engine stuff, which is easy peasy  Also got the secondary pulleys drained and refilled, and the same with the primary splitter. The primary pulleys don't have a drain so they can make do with what's in them for now Then the belts came off so I could get at the rust on the pulleys. The belts themselves don't look too bad:   Although I'm not sure they were this shape when they went on ;D  Meanwhile, the rust on the pulleys was a little (!!) worse than it looked with the belts on. This was one of the smaller patches:  It took about 90 minutes of emery cloth, wire brushing and a flap wheel in a drill to get the lumpy bits down below the level of the original surface but got there in the end, then smothered all 4 pulleys with rust converter:  That can do it's job overnight, then I need to decide whether to run them with the (now smooth) pitting or to try skimming the pits with chemical metal and sanding smooth. If anyone's tried that I'd be interested to know how well it worked / lasted? |
|
33grinder
Likes DAFs
CHPD* sufferer (*Compulsive Heap Purchasing Disorder)
Posts: 2,905
|
Post by 33grinder on Mar 31, 2011 18:59:29 GMT
Assuming you'll be buying new belts for 'peace of mind' and given your time constraints I'd be tempted to run the old belts to clean up the pulley faces and keep your peace of mind in her boot. |
|
spunkymonkey
Likes DAFs
Currently waltzing Matilda
Posts: 3,482
|
Post by spunkymonkey on Mar 31, 2011 19:09:56 GMT
That's exactly what I'm thinking, Pete We've got a spare set here ready for whichever one needs them first so we can run till they break, replace, then replace the replacements. Given the apparent condition of these ones it seems pointless to change them as a matter of course - let them take the beating from the pulleys and (hopefully) giuve the next new set an easier time. Especially seeing as she has the removable hatch to make changing them sooooo much easier |
|
kenr
Likes DAFs
Vee the 33
Posts: 734
|
Post by kenr on Mar 31, 2011 19:53:52 GMT
Those little eybrows are sooooooooooooo cute!
|
|
33grinder
Likes DAFs
CHPD* sufferer (*Compulsive Heap Purchasing Disorder)
Posts: 2,905
|
Post by 33grinder on Mar 31, 2011 20:35:51 GMT
Ah yes, the peaks! I meant to ask you about them Joe!
All down to personal taste, kind of like them for removing the startled rabbit look personally. Are they chrome?
I'm looking forward to the day I check out Tigga's belts from her removable hatch (haven't checked but assume being a 32 she'll have one). Wonder whether PassionWaggon has a hatch opening under that funky carpet...
|
|
spunkymonkey
Likes DAFs
Currently waltzing Matilda
Posts: 3,482
|
Post by spunkymonkey on Mar 31, 2011 20:54:32 GMT
Some people have no sense of cute They're proper stainless steel, Pete, to match the quality bumpers ;D They were £10.75 a pair but seem to have gone up to £15.30 now from www.classic-car-accessories.co.uk/ (search for headlamp visor). These are the "Slim" design and they fit even though they're listed for 7 inch lights - you just need to (gently) curve them till they fit nice & snug inside the rim |
|
33grinder
Likes DAFs
CHPD* sufferer (*Compulsive Heap Purchasing Disorder)
Posts: 2,905
|
Post by 33grinder on Apr 1, 2011 7:51:12 GMT
I'm sure Gavina would like a bit of bling John, she has to earn it first though! |
|
spunkymonkey
Likes DAFs
Currently waltzing Matilda
Posts: 3,482
|
Post by spunkymonkey on Apr 1, 2011 18:50:33 GMT
Hit a bit of a snag today with the prop shaft. It was very tight to remove (had to undo the access panel and lever it forwards) and the splines + spring were absolutely covered in gooey dead grease. So cleaned it all up today and went to refit - it won't go back on the primary input shaft! I've been under the car and cleaned the shaft, and got the splines in the shaft clean enough that they'll slide onto the clutch shaft happily, but they go about 1/4 inch onto the primary input and stick solid. I'm at a bit of a loss why for now so left it for another day. If anyone's experienced this themselves then any suggestions will be gratefully received in the meantime! Still, it wasn't a totally unproductive time down there. Got the rear windows cleaned up and fitted:    and the belts fitted and adjusted: 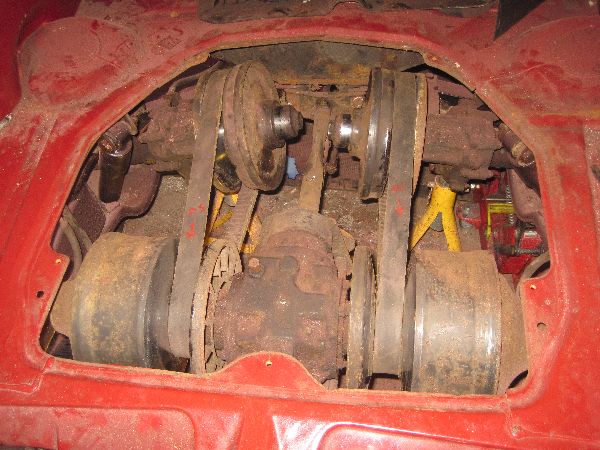 Finally, the all-important Daffodil badge got a coating of chrome spray:  I've also tried spray lacquer over the side vents and can confirm that it instantly turns the shiny metal effect to a gloss grey - that's after they'd had about a week to harden. No reaction as such, you can just see it slightly dissolving the top layer so all the metal particles flow into a different (and not shiny) pattern. Still, they're clean and smooth and the finish should match the aluminium screen surrounds quite well so it's not too serious |
|
pauldaf44
Likes DAFs
Totally addicted to quirky tat
Posts: 2,068
|
Post by pauldaf44 on Apr 1, 2011 19:32:07 GMT
Hit a bit of a snag today with the prop shaft. It was very tight to remove (had to undo the access panel and lever it forwards) and the splines + spring were absolutely covered in gooey dead grease. So cleaned it all up today and went to refit - it won't go back on the primary input shaft! I've been under the car and cleaned the shaft, and got the splines in the shaft clean enough that they'll slide onto the clutch shaft happily, but they go about 1/4 inch onto the primary input and stick solid. I'm at a bit of a loss why for now so left it for another day. If anyone's experienced this themselves then any suggestions will be gratefully received in the meantime! Yes ive had that with Gladys but at the other end. The way we sorted it was to turn the engine over with the vario in neutral which pushed it back into alignment. |
|
33grinder
Likes DAFs
CHPD* sufferer (*Compulsive Heap Purchasing Disorder)
Posts: 2,905
|
Post by 33grinder on Apr 1, 2011 19:48:15 GMT
I can only think of perhaps some surface rust on the splines causing an interference. Plenty of copperslip is what I use on mine and it shouldn't go home fully otherwise the spring is knackered. |
|
spunkymonkey
Likes DAFs
Currently waltzing Matilda
Posts: 3,482
|
Post by spunkymonkey on Apr 1, 2011 20:00:25 GMT
Won't go on far enough for the spring to even make contact  I've scrubbed the splines clean with a brass brush, then wiped each groove individually, and smothered in copaslip but still won't go on. There's no visible damage or signs of high-spots on the splines after cleaning. The same end of the prop will go onto the clutch shaft, but neither end of the prop will go onto the primary input shaft. As for alignment, the splines are going far enough in to give a solid drive so they are aligning ok - they just won't go all the way. |
|
pauldaf44
Likes DAFs
Totally addicted to quirky tat
Posts: 2,068
|
Post by pauldaf44 on Apr 1, 2011 20:05:46 GMT
Yeah mine was compressing the spring all the way and not going properly onto the clutch shaft. As I said turning the engine over made it pop into position. It also makes it easier if the back of the car is jacked up so that the swing axles drop. Dont ask me why though it just is
|
|
spunkymonkey
Likes DAFs
Currently waltzing Matilda
Posts: 3,482
|
Post by spunkymonkey on Apr 1, 2011 20:12:45 GMT
I see what you're saying, Paul, but it islining up ok. I still have the engine out so I can turn the shaft by hand as I fit it and feel when it drops onto the splines. At that point there is solid drive back to the wheels so they're definitely locating properly. But it then refuses to slide on more than another 1/4 inch or so before coming up solid.
There are also signs of hammering around the cup at the rear end of the prop, almost as if someone's had this problem before and tried to tap it back into place rather than finding and fixing the cause.
|
|
33grinder
Likes DAFs
CHPD* sufferer (*Compulsive Heap Purchasing Disorder)
Posts: 2,905
|
Post by 33grinder on Apr 1, 2011 21:04:00 GMT
Odd. Does the other end fit any better and if so, how does the suspect end fit on the clutch? The props are only light so if it worked the other way I doubt it would cause any balance issues.
|
|
spunkymonkey
Likes DAFs
Currently waltzing Matilda
Posts: 3,482
|
Post by spunkymonkey on Apr 1, 2011 21:10:26 GMT
Nope, both ends fit the clutch fine, neither end fits the primary. I do have a spare prop (which probably has more wear on it) so may try that just to see if it's a "big" bind or a small one.
|
|
33grinder
Likes DAFs
CHPD* sufferer (*Compulsive Heap Purchasing Disorder)
Posts: 2,905
|
Post by 33grinder on Apr 1, 2011 22:16:29 GMT
Fair dos Joe. I could always ask Matt whether we have a 33 prop although I've a feeling Gavina took the last one, but like the driveshaft I could well be wrong. I could ask about a 33 vario in case that side is the problem.
|
|
spunkymonkey
Likes DAFs
Currently waltzing Matilda
Posts: 3,482
|
Post by spunkymonkey on Apr 1, 2011 22:24:39 GMT
Thanks Pete, but should have it covered one way or another. Got a loose spare prop already and a spare prop and vario if needed - although that would entail some fairly major dismantling elsewhere |
|
spunkymonkey
Likes DAFs
Currently waltzing Matilda
Posts: 3,482
|
Post by spunkymonkey on Apr 2, 2011 11:59:51 GMT
 The hammer matks on mine are no-where near as bad as that, John! Just a few light taps on the "front" end of the cup as if someone got tired of trying to seat it properly! It doesn't seem to be going on far enough for a bent shaft to be causing it, and the female end goes onto the clutch shaft happily so there can't be too much wrong there. Woke up feeling a little headachy and tired this morning so haven't got down to play yet but will be on the case a bit later after another coffee ;D |
|
spunkymonkey
Likes DAFs
Currently waltzing Matilda
Posts: 3,482
|
Post by spunkymonkey on Apr 2, 2011 19:09:17 GMT
Well, that was a frustrating day! First the satisfying bit - I took the vent covers down and tried them against the new paint. I think this is acceptable  Then the not so satisfying. This is as far as the prop would go onto the primary splines:  I tried both ends of both props and they were all the same - they also all fit the clutch shaft happily. So it had to be the primary splines, and this is them:  There was a very slight burr on the end of the one in the centre, and the wear marks which show slightly uneven contact on some of them but other than that nothing I could see wrong. But there clearly is a problem, so I resorted to brute force and hammered the spare prop on. As soon as it was on more than about an inch, it started to slide by hand as it should, so there has to be a problem with that first inch or so of the splines! Cue some very gentle work with a Dremel to relieve the areas which were showing "heavy" contact according to the wear marks. The original prop now fits, but does require gentle tapping from the front to get over that first little bit. That's good enough for me, and preferable to making it too loose and ending up with bangs and clunks as the drive takes up! So I decided to crack on and get the engine in. A word of advice here: When building one of these, the front mounting bar needs to be fitted before you fit the heat exchangers. Otherwise you'll find yourself removing the exchangers again to fit it  Having spent half an hour or so putting that little mistake right, got her in, got her connected to the prop, and got her onto the rear mounts. Only to find that the front mounts are so far out of place that there's no way they're going to line up with the mounting holes!  At that point I threw my tools down in disgust and came home for coffee. |
|
pauldaf44
Likes DAFs
Totally addicted to quirky tat
Posts: 2,068
|
Post by pauldaf44 on Apr 2, 2011 20:13:40 GMT
Just a thought try turning the front mounting bar round and then refitting it. From the looks of your last photo it may then line up
|
|
spunkymonkey
Likes DAFs
Currently waltzing Matilda
Posts: 3,482
|
Post by spunkymonkey on Apr 2, 2011 20:21:23 GMT
It's the one that came off it, and it's the same way round that it came off: 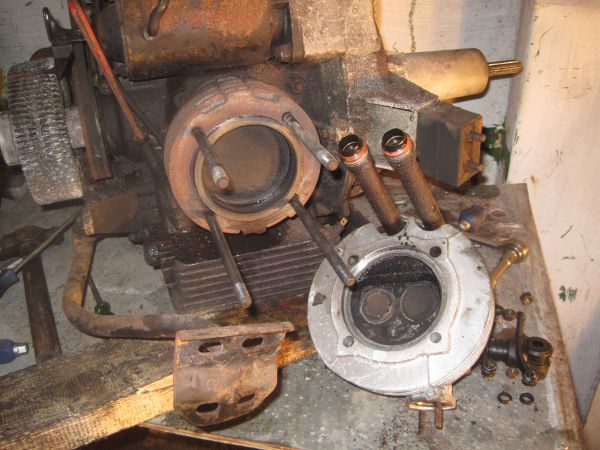 The only bit that's different is the rubber mount itself because the old one was in 2 bits so Matt sent one up. I guess it might have been a 44 one if it was off a lose engine down there but is there a difference between them?  |
|
33grinder
Likes DAFs
CHPD* sufferer (*Compulsive Heap Purchasing Disorder)
Posts: 2,905
|
Post by 33grinder on Apr 2, 2011 20:22:41 GMT
;D ;D I've made that mistake with the front bar myself Joe, easily done and I dare say you won't be the last to do that! Nothing that can't be put straight with a bit of swearing...  |
|
spunkymonkey
Likes DAFs
Currently waltzing Matilda
Posts: 3,482
|
Post by spunkymonkey on Apr 2, 2011 20:41:28 GMT
No, same bar just with a coat of paint on it. I can guarantee it's the same one because the only spare I've got came on the engine from John J and I didn't collect that until after the bar was painted And, no, the paint didn't squeeze it out of shape as it dried ;D |
|
33grinder
Likes DAFs
CHPD* sufferer (*Compulsive Heap Purchasing Disorder)
Posts: 2,905
|
Post by 33grinder on Apr 2, 2011 21:52:35 GMT
The bar (steward) is the right way round Joe, I've just checked Gavina's. Now, why won't her bonnet snap shut for me? |
|
kenr
Likes DAFs
Vee the 33
Posts: 734
|
Post by kenr on Apr 2, 2011 22:52:16 GMT
Oh Pete, what have you done? Leave you alone with the car for 5 minutes and .......
Check the striker plate hasn't moved or the wire catch (most likely culprit).
|
|
33grinder
Likes DAFs
CHPD* sufferer (*Compulsive Heap Purchasing Disorder)
Posts: 2,905
|
Post by 33grinder on Apr 3, 2011 10:03:35 GMT
I started to look last night Ken but the bonnet slamming started the muppet barking and then I received some stern looks from Mrs G. Will continue looking today though.
|
|
spunkymonkey
Likes DAFs
Currently waltzing Matilda
Posts: 3,482
|
Post by spunkymonkey on Apr 3, 2011 18:56:58 GMT
Productive day today The mounting bar problem was solved - having taken it off and compared to the spare one, the problem was pretty obvious. This is the o/s ends lined up: 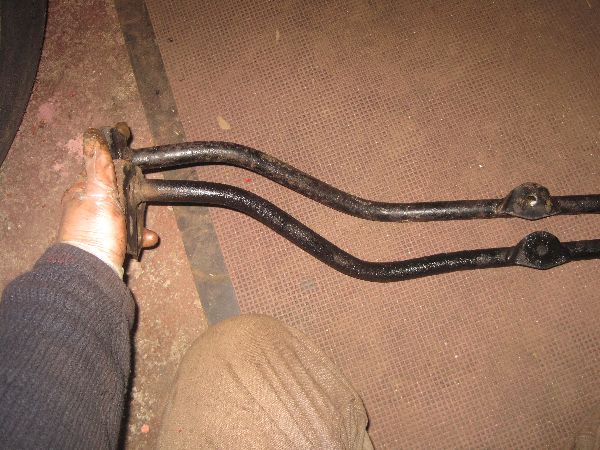 And this is the n/s without moving them: 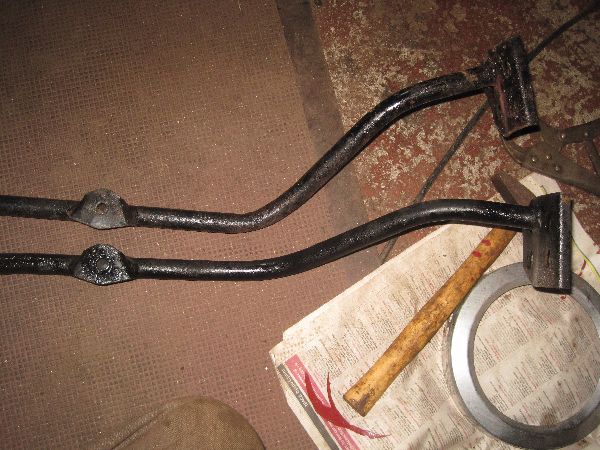 Yes, there was a huge bend in the bar! Considering it was like that while it was on the car (there's no way I've subjected it to that sort of force in the workshop!) it's a bit of a mystery how it happened but a quick paint and fit of the other bar got it sorted easily enough, resulting in this ;D 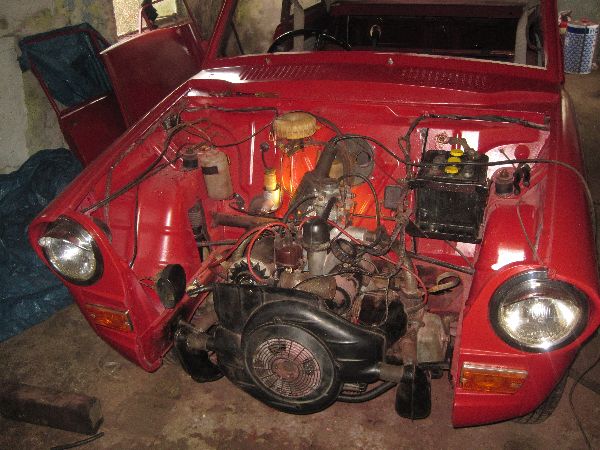 Fully connected, except for the heater cables because the end fell off one as I went to connect it so have to get a couple of bike cables as replacements. Tried cranking her over (no petrol in the tank) and the oil light goes out reassuringly after about 4 or 5 seconds at cranking speed, which must be good! Now a view of the back - can y'tell what's new yet? 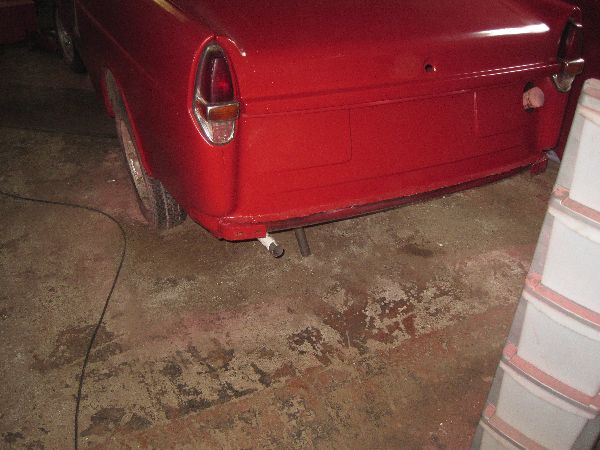 Yes, all that pipe I bought a few weeks back has been melted together like this: 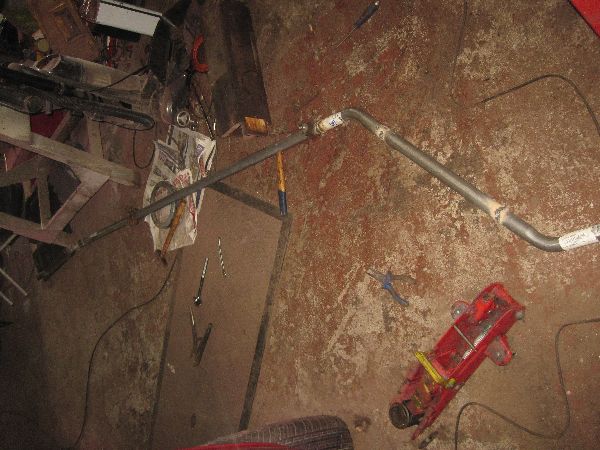 and fits nicely under her like this: 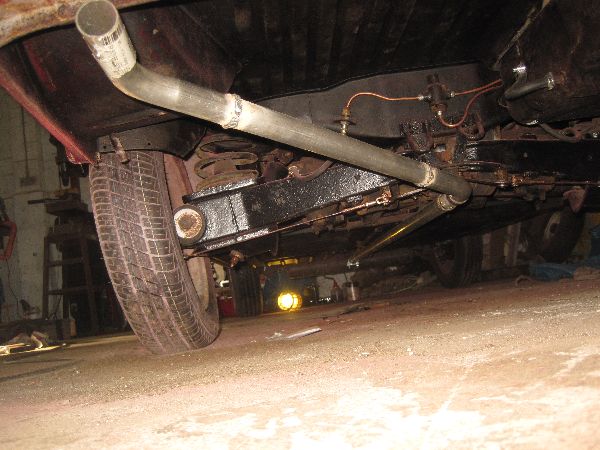 It's currently missing one rubber loop from the centre mount and I have to make up a rear mount because the original clamped to the tiny original tailpipe and won't fit on this. The original tail was about 3/4 inch diameter where it came out of the rear resonator - that's one restriction that just had to go! Having got that fitted up, there was only one thing to do - steal some fuel from one of the semi-dead cars down there (with the owner's assistance so it wasn't really stealing) and see what happens. We managed to collect about 1 1/2 litres so put most in the tank and a little dribble in the carb. The battery's taken a bit of a hammering over the past week or so but, on a worryingly slow cranking speed, she fired! She then moved. In my enthusiasm I'd forgotten to check she was in neutral and she jumped backwards about 6 inches! Luckily, the engine died almost as fast as it fired cos I don't think I would have reacted fast enough to avoid driving her backwards into a wall from my perch on the floor. Which would have been awfully embarrassing to have to report..... Trying again with her in neutral, there seems to be a fairly heavy vibration which might be prop balance or exhaust or (possibly) the little nylon bushes that the primary slides on at the front end? Does anyone know if having one of these missing put everything out of alignment enough to cause vibration? If it does then I may have to do some rapid tool-making for Mr Polybush and ask him nicely to pour some next time he's doing a batch of something! Anyway, to sum up the day, Matilda has her engine in, her exhaust fitted and has (accidentally) moved under her own power for the first time since 1978 ;D |
|
spunkymonkey
Likes DAFs
Currently waltzing Matilda
Posts: 3,482
|
Post by spunkymonkey on Apr 3, 2011 21:26:53 GMT
Definitely couldn't have mixed them up, Mac. I painted that one on 5th Feb: Seems I spent the day today painting and decorating after all. At least it wasn't walls:  and didn't collect the spare engine (with the spare mounting bar) until the 8th: Had a trip up to Manchester yesterday, which I've mentioned elsewhere, to meet Johnjenks and his blue 33. We were intending to pick up some useful bits off his spares car but seem to have come back with a little more of it than we expected. On the other hand, I've remembered that when we dragged her out of the garage on 4 flat tyres and binding brakes, the only place I could reach to attach the rope until she was out in the open was on that bar. Guess that might have twisted it a little ;D |
|
spunkymonkey
Likes DAFs
Currently waltzing Matilda
Posts: 3,482
|
Post by spunkymonkey on Apr 4, 2011 19:38:49 GMT
More progress this afternoon. Decided that leaving the vario bushless on one side wasn't the best idea while it was accessible so had a word with the poly guy. He had a look at the setup and confirmed what I thought - those little nylon bushes have no isolation value at all because the big rubber mounts provide that, so they're only there for the adjusters to slide on. In which case some nice 13mm internal, 16mm external stainless steel tubes will do just as well:  The only problem is that you cant get a "full length" stainless tube (which would be 35mm long) into place with the vario fitted. But stainless is an awful lot stronger than the old nylon ones so we decided that 25mm ones (which would fit) should give plenty of support. A quick test-fit confirmed they'd go in:  So a good glob of coppaslip:  And start levering the first one into place using a jack to lift the vario and hold it so everything lined up about right:  Once it was firmly in place, a few gentle taps got it nicely into the bracket:   On the other side, most of the nylon bush was still in place so it needed to be levered and hammered (a little harder) at the same time in order to drive the nylon one out:  A quick test slackening and re-tensioning the belts showed up a modification design flaw, but only a minor one. As the belts are slackened off the spacer moves back happily with the bracket but, when you wind forward again, they twist slightly on the mounting peg (which is only half-way into them by then) and stick so the bracket starts to move forwards without them. So they'll need easing back in after belt changes but that's a pretty minor problem Anyway, having sorted that, I was finally ready to get the vario guards (top and bottom) back into place. Now I just know that after I did the exhaust yesterday everyone was waiting to gloat when it didn't line up with the vario guards........  Sorry to disappoint y'all With things moving on so well I decided to do a couple of straightforward bits that would some of the bulky stuff out of my way - I've spent the last few weeks tip-toeing around various panels, seats, glass and so on trying not to stand on or trip over any of it! So the back seats went back in:  Followed by the bootlid and lock:  By then it was time for a sit-down and a cup of coffee, but not on those seats with my work clothes on unless I want some serious Sian-shaped earache, so it was time to pack up and go home. Tomorrow I plan to get some fuel in and the (still recharging) battery back on. Once I'm happy she runs and doesn't shake too much the front can start going back together. If the vibration hasn't gone then it'll be engine out again, but I really don't want to think about that for now |
|


 The hammer matks on mine are no-where near as bad as that, John! Just a few light taps on the "front" end of the cup as if someone got tired of trying to seat it properly! It doesn't seem to be going on far enough for a bent shaft to be causing it, and the female end goes onto the clutch shaft happily so there can't be too much wrong there.
