spunkymonkey
Likes DAFs
Currently waltzing Matilda
Posts: 3,482
|
Post by spunkymonkey on Feb 11, 2011 23:17:24 GMT
If I know the engine I tend to lay them on the top of the piston and carefully open them with my thumbs just enough for them to slide down over without scratching the piston. I'm not a fan of working from one groove to the next because there's a risk of them catching, twisting and breaking.
If I don't know the engine (some seem to break easier than others) then basically the same method but run a couple of thin (6 thou or so) feeler gauge blades down inside them where the ring ends are and another one opposite the gap, then open them just enough to slip onto the piston top with the blades inside. You can then slide them down the blades without scratching the piston and guarantee that you're not opening them any more than needed.
|
|
33grinder
Likes DAFs
CHPD* sufferer (*Compulsive Heap Purchasing Disorder)
Posts: 2,905
|
Post by 33grinder on Feb 12, 2011 0:23:46 GMT
Is there not a tool that spreads the ring evenly to allow it to slip over easier, sure I've seen one before?
|
|
spunkymonkey
Likes DAFs
Currently waltzing Matilda
Posts: 3,482
|
Post by spunkymonkey on Feb 12, 2011 19:58:00 GMT
And here's the poor-man's version:  Note the way it mimics the "4 point" action of the posh type that Mac posted ;D Anyway, back to assembly. Again, there wasn't as much action as hoped for because about 2 hours were wasted helping move the new lathe into place - I say "wasted" because I wanted to get on with the engine, but a lathe that's big enough for flywheel / clutch drum / brake drum and disk skimming is a very welcome addition to facilities down there  I also took a couple of extra photos that I'd missed yesterday to hopefully clarify a couple of the points. I mentioned that the top of each ring is marked - it will look something like this:  When preparing to fit the ring compressor, the piston should be placed in the bore, resting on the lower ring, like this:  Note that I'd marked the barrel with paint ("L" on the left one and "R" on the right) at the top before disassembly. That makes sure everything goes back in on the correct side and the correct way up. Once the ring compressor is fitted, this is the sort of problem you're looking for before trying to tap the piston into the bore:  The lower rail of the oil control ring has slipped out of the compressor. If this happens it won't go into the bore without breaking something first! Now back to assembly. The next stage after yesterday is to remove the head nuts again and refit with the engine lifting bracket under the top two and washers under the bottom two:  and torque them down:  Torque in three stages - do them all up to 5 lbft then go round again and increase them to 10 lbft. Finally, go round again to a final torque of 15 lbft. Now turn the engine gently, feeling for any tight spots or "odd" feeling bits. Remember that the other con-rod is loose, so support it with your hand as you do this to stop it flapping around. If everything feels ok through a full revolution then turn the engine to TDC with both valves on the fitted head closed. Now set the valve clearances:  You can leave them once it's all finished if you like but I tend to do them now because access is easy and, once they're done I can fit the rocker cover and "know" that I've finished that side.  If you may get interruptions it gives a useful break-point to help avoiding missing stuff or having to do things twice "just to be sure". Now start on the other side and fit the other piston, barrel and head. Next fit the crankshaft pulley:  To tighten the crank pulley, feed some rope into one of the plug holes while turning the engine slowly. Keep feeding rope until the engine won't turn (the rope will stop the piston reaching tdc):  You can now tighten the crank pulley nut to the required torque of 58 lbft. Fit the front engine mount rubber. If you forget this now it will be very hard indeed to get to later:  On the same basis, now is a good time to fit the fuel hoses to the pump - once the dynamo's in place they're almost impossible to get to:  Now fit the dynamo and drive belt. You can do this after the oil cooler if you really want to but it's easier now. Place the oil cooler in position and fit the 3 securing bolts loosely. Connect up the oil cooler pipes, remembering the two copper washers on the banjo bolt:  Tighten the two pipe unions, using a torque value of 14.5 lb ft for the banjo blot. Do not over tighten this bolt because it's hollow and so easy to snap. Once tightened, wire lock the bolt to the pipe:  and tighten the 3 oil cooler mounting bolts. On the basis of "not forgetting things" now is a good time to add oil and fit the oil filler cap:  You now have the major parts of the build complete and it's really starting to look like an engine again:  |
|
kenr
Likes DAFs
Vee the 33
Posts: 734
|
Post by kenr on Feb 12, 2011 21:25:15 GMT
Wow. I didn't understand most of what was there but it looked bloomin' impressive Joe.
|
|
33grinder
Likes DAFs
CHPD* sufferer (*Compulsive Heap Purchasing Disorder)
Posts: 2,905
|
Post by 33grinder on Feb 12, 2011 23:13:31 GMT
ANOTHER great report Joe. I never cease to be impressed by your progress everytime you post an update. Bet you can't wait to get it fired up? Are you going to be patient and wait until it's back in the car or are you resisting the temptation to set up a test bench? ;D
|
|
spunkymonkey
Likes DAFs
Currently waltzing Matilda
Posts: 3,482
|
Post by spunkymonkey on Feb 12, 2011 23:17:22 GMT
Err, not much chance of it waiting till it's back in, Pete. I have a couple of litres of fuel in a can in Sheila's boot just waiting to help warm the globe.......
|
|
33grinder
Likes DAFs
CHPD* sufferer (*Compulsive Heap Purchasing Disorder)
Posts: 2,905
|
Post by 33grinder on Feb 12, 2011 23:30:17 GMT
Go for it Joe, just put some ear defenders on first though!  ;D |
|
spunkymonkey
Likes DAFs
Currently waltzing Matilda
Posts: 3,482
|
Post by spunkymonkey on Feb 14, 2011 22:23:35 GMT
I do too, Mac, but I also tend to cover them and push down with my finger tips, which doesn't make a good photo of what's going on Anyway, back to updates if anyone would like one? Had to take a break from the front end of the engine today because both of the impeller cowls I had available were pretty badly cracked up. A serviceable one has been patched together but I only had standard araldite so left it to dry while I got on with the clutch end. Which is when I realised I hadn't got round to cleaning any of those bits  Having put that right, the first step was to refit the flywheel. When doing this, make sure that the hub on the crankshaft and the inside of the flywheel are absolutely clean. If the flywheel doesn't seat squarely you'll get a lot of vibration!   Next, apply thread-lock (locktite) to the bolts, fit the locking tab plate if fitted) and bolts and torque to 20 lbft for UNF bolts or 29 lbft for metric ones. Bend the lock tabs up to lock the bolts:  Fit a "wavy" washer to each pivot and apply a light smear of copper grease to the clutch shoe pivots:  Next fit the clutch shoes. These vary slightly depending on the clutch version - Matilda has the early version with 8 separate springs. On this version, connect the trailing shoes to the centre plate using the 4 long springs and fit the assembly to the pivots as a unit:  Now fit one of the leading shoes, using a short spring:  then fit the opposite one, followed by the other two. Doing the shoes in opposite pairs helps to keep the centre plate central, which reduces the force needed to pull each shoe into place. Now fit the remaining 8 wavy washers:  the shoe retaining plates:  and the R clips - make sure these are fitted from the centre, pointing outwards, or they will fly off in use!  Normally, you'd now be ready to offer up the bellhousing and clutch drum but, in this case, this was when I noticed a little roughness in the bellhousing bearing. As the bearing is the same as the outer wheel bearings, I had one to hand so decided to change it now rather than regret it later. I'll break the post here because otherwise it's going to get long! |
|
Bob Scrivens
Likes DAFs
Ex owner of the green machine
Posts: 534
|
Post by Bob Scrivens on Feb 14, 2011 22:48:57 GMT
Old shoes looking in good condition Joe!
Bob
|
|
spunkymonkey
Likes DAFs
Currently waltzing Matilda
Posts: 3,482
|
Post by spunkymonkey on Feb 14, 2011 22:53:13 GMT
The book specifies a press for changing the clutch bearing in the bellhousing. There is one in the workshop, but we don't want to use that cos not everyone will have one, so, to change the clutch bearing: First of all, remove the star washer (as Matilda has) or the circlip and spacer (which later cars have) from the shaft:  The star clip can be removed by using a thing screwdriver underneath it and lifting it very slightly while turning the clutch drum so that you work it up evenly a little bit at a time. You should be able to tap the shaft out of the old bearing (with suitable protection for the shaft end of course!) but it's likely to be tight if it's been there for 40+ years so our old friend the 3-leg puller with rope comes into play again:  Wind some pressure onto it then tap the end of the puller sharply and you should get movement. Once the shaft's out remove the large bearing retaining circlip:  and uses a long drift, or an extension with suitable socked on the end, to drift the bearing out:   Make sure the bearing seat in the bellhousing is clean and drop the new bearing into place:  Then tap it fully home. To do this you need a piece of tube so that you're tapping on the outer race only. If you start hitting the inner race or the seals you'll wreck the new bearing:  Then fit the large circlip:  Make sure the circlip seats properly into it's groove. If it won't then remove it again and tap the bearing a little more to be sure it's seated properly. Now make sure the shaft is clean and slide it into place through the bearing. Support the front end of the shaft on a block of wood:  and tap the whole bearing / bellhousing assembly down onto it. In this case you need a tube (or, in this case, an improvisation of sockets and tubes) which will allow you to hit only the inner race of the bearing. Again, if you hit the wrong part you'll destroy (or seriously reduce the life of) the bearing:  Once the shaft is fully home:  you can refit the star clip or spacer and circlip and the bellhousing is ready to fit to the engine. Offer the whole housing up, keeping it as square as possible, and locate the two studs at the lower left and right hand side. You should be able to get these through far enough to start their nuts, without washers if need be:  Gently wind the housing in using these two nuts until you can get one of the longer bolts through in the top. Now tighten the bolt and the nuts evenly to pull the housing into place, checking all the time that it's going on straight and without too much force. Also make sure that the clutch drum is free to turn. You may get a bit of drag as it goes on but it should be free once it's fully home:  The housing is now ready to bolt up but, after the delays cleaning stuff and changing the bearing, that's a job for another day:  |
|
spunkymonkey
Likes DAFs
Currently waltzing Matilda
Posts: 3,482
|
Post by spunkymonkey on Feb 14, 2011 22:56:52 GMT
Old shoes looking in good condition Joe! Bob They do, don't they? I checked them all for loose linings and dug pretty aggressively at a couple of them but no sign of them letting go. Hopefully they'll behave themselves in use! |
|
spunkymonkey
Likes DAFs
Currently waltzing Matilda
Posts: 3,482
|
Post by spunkymonkey on Feb 15, 2011 0:01:04 GMT
Oops. Sorted |
|
|
|
Post by dafdaffer on Feb 15, 2011 0:12:22 GMT
very clear instructions SM..... i will be doing the same to biddy one day  |
|
33grinder
Likes DAFs
CHPD* sufferer (*Compulsive Heap Purchasing Disorder)
Posts: 2,905
|
Post by 33grinder on Feb 15, 2011 0:30:27 GMT
Another superb report!  Keep up the good work!! |
|
spunkymonkey
Likes DAFs
Currently waltzing Matilda
Posts: 3,482
|
Post by spunkymonkey on Feb 15, 2011 12:26:22 GMT
Ahh, you spotted the deliberate mistake in the write-up, John No, there's no felt washer because this engine has the later clutch shaft with a ball bearing instead of a pilot in the crank. The bearing is supposed to sit in the centre of the flywheel, butted up against the very big circlip (the one I decided not to remove) but it pulled out on the shaft in this case. Rather than risking damage to the bearing by pulling it off I left it in place and refitted it as I was fitting the bellhousing but forgot to take a photo to show it. If you look very closely at the photo above of the clutch shaft supported on a block of wood (preparing to refit the shaft to the housing) you can just see the edge of it shining under the clutch drum. *** Edited to add *** Just checked, and here's a photo I prepared earlier: 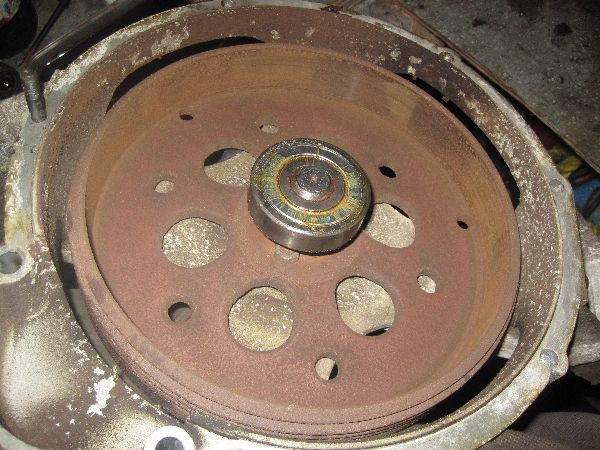 In case anyone's wondering, I didn't replace that bearing because it felt ok and, in any case, it's only doing anything when you're sitting at idle. As soon as the clutch engages, the drum, bearing and flywheel rotate as a single unit. So it's only ever spinning at about 900rpm max, and even then only when you're sitting still in gear. That's hardly a difficult life for a ball bearing! Incidentally, for those with good memories, when I removed the flywheel I marked one dowel and one dowel hole to be sure it went back on in the same position. As it turns out there was no need for that because the dowels are slightly offset compared to the bolt holes, so the bolts will only go in if it's fitted the "right" way. From that sort of detail, and the remarkable tolerances on piston and con-rod weights, I guess Daf took balance seriously on these engines! |
|
spunkymonkey
Likes DAFs
Currently waltzing Matilda
Posts: 3,482
|
Post by spunkymonkey on Feb 15, 2011 20:16:06 GMT
Update anyone? Went down today to continue with the few bits of assembly left to do. No in-depth instructions here because it's all pretty straightforward bolt-on stuff. The hardest part is working out which bolts went where! First the exhaust cross-brace goes onto the bottom studs of the bellhousing:  Then fit the starter motor and the rest of the bellhousing bolts:  The air cowlings go on:  Along with the inlet manifold and carb:  and the front cowling, the impeller and the impeller guard:   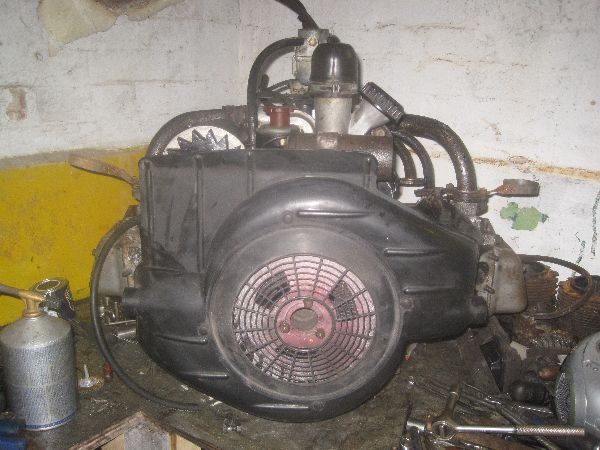 Now fit the heat exchangers and get it off the bench onto wood blocks:  The next bit is really a little naughty on health & safety grounds but we don't care about that, do we? If you look closely in the last pic you'll see that there's a fuel can on one side of the engine and a battery on the other. It just had to be done..... ;D |
|
33grinder
Likes DAFs
CHPD* sufferer (*Compulsive Heap Purchasing Disorder)
Posts: 2,905
|
Post by 33grinder on Feb 15, 2011 21:20:23 GMT
Superb! Top man! Very well done! That's one major box ticked. If ever you feel like progressing onto V8s, do let me know as I could do with some of your good fortune! ;D When will Matilda be saying hello to her freshly rebuilt engine? |
|
spunkymonkey
Likes DAFs
Currently waltzing Matilda
Posts: 3,482
|
Post by spunkymonkey on Feb 15, 2011 21:39:35 GMT
Brakes an wheel bearings next, then suspension and vario, then bodywork, then back together. Aiming to finish for mid- April so Betty has time for some bodywork before Henblas. I'm not starting to panic, honest......  |
|
kenr
Likes DAFs
Vee the 33
Posts: 734
|
Post by kenr on Feb 15, 2011 22:00:30 GMT
Yeeeeeehaaaa! She runs! Nice one Joe. First Snowstrop and now Matilda.
Ken
|
|
Bob Scrivens
Likes DAFs
Ex owner of the green machine
Posts: 534
|
Post by Bob Scrivens on Feb 16, 2011 21:42:46 GMT
Cannot wait to see it PURR in the car Joe.
Excellent job.
Bob.
|
|
|
|
Post by dafdaffer on Feb 16, 2011 21:54:02 GMT
Well done Joe..... good to hear life in the old motor again  |
|
spunkymonkey
Likes DAFs
Currently waltzing Matilda
Posts: 3,482
|
Post by spunkymonkey on Feb 16, 2011 22:44:38 GMT
Thanks everyone ;D My allotted task for today was to clear up the complete mess that doing the engine had left the workshop in. Oh, I also couldn't resist running her up again for a couple of minutes - almost got her off choke! So no progress as such but the space is now ready to start on replacing the brake pipes, wheel cylinders and cleaning everything up so she'll be able to safely control the raw power in that engine Then it'll be time for stripping the doors, bonnet etc and getting some repairs done ready for paint. The only slight worry there is that the guy's moved in next door with his poly bush production stuff and he uses a lot of silicone release spray. depending how far it carries in the air that could cause real headaches when it comes to putting paint on..... |
|
spunkymonkey
Likes DAFs
Currently waltzing Matilda
Posts: 3,482
|
Post by spunkymonkey on Feb 17, 2011 11:16:16 GMT
Cool!!! That should give me 4 or 5 days to sort the brakes, just ready to start playing bodywork when it arrives ;D
Thanks, John!
|
|
spunkymonkey
Likes DAFs
Currently waltzing Matilda
Posts: 3,482
|
Post by spunkymonkey on Feb 17, 2011 20:28:04 GMT
Been bad, wasn't my fault, couldn't help it! Sorted out the missing hotspot pipe on Matilda's engine this afternoon and was meant to be starting to strip the brakes after that. But I had a niggling feeling that all wasn't quite right when I ran her up and, sure enough, the idle jet was blocked. So got distracted sorting that (and the acceleration pump) out and then she (obviously) had to be tested again Really must stop playing engines now and get on with the rest of her....... ;D |
|
Bob Scrivens
Likes DAFs
Ex owner of the green machine
Posts: 534
|
Post by Bob Scrivens on Feb 17, 2011 20:34:43 GMT
Cor thats sounding better every time.
Bob
|
|
33grinder
Likes DAFs
CHPD* sufferer (*Compulsive Heap Purchasing Disorder)
Posts: 2,905
|
Post by 33grinder on Feb 17, 2011 21:47:47 GMT
Oh bloomin' he'll Joe! The first video I could watch on my mobile, this one won't let me watch it! Guess I'd better boot up the PC then! ;D |
|
spunkymonkey
Likes DAFs
Currently waltzing Matilda
Posts: 3,482
|
Post by spunkymonkey on Feb 17, 2011 21:54:16 GMT
Odd - taken on the same camera, edited with the same software within about 4 seconds of each other for length, and uploaded to the same Youtube account. Not sure why one works and the other doesn't for you  |
|
33grinder
Likes DAFs
CHPD* sufferer (*Compulsive Heap Purchasing Disorder)
Posts: 2,905
|
Post by 33grinder on Feb 17, 2011 22:45:32 GMT
Never mind, I'm on the PC now and it was worth booting up for the video! She's running really sweet Joe, well done! |
|
spunkymonkey
Likes DAFs
Currently waltzing Matilda
Posts: 3,482
|
Post by spunkymonkey on Feb 17, 2011 23:20:30 GMT
Cheers, Pete - I'm just glad the clutch disengaged properly for the (highly H&S aware) check of it at the end |
|
spunkymonkey
Likes DAFs
Currently waltzing Matilda
Posts: 3,482
|
Post by spunkymonkey on Feb 18, 2011 20:04:27 GMT
Started the brakes today, with a discovery that people got it just as wrong 30 years ago as they do today when working on cars:  Only whoever serviced these last hadn't forgotten that top pull-off spring, they'd left it rattling around inside the drum....  Oops! Anyway, soon had the shoes off:  and the backplate, to show the wheel bearing:  It's a little gummy round there but the bearing looks good so I'll pull the shaft and re-grease if it's smooth. The state of that oil definitely suggests a transmission oil change is on the cards though! But today was about brakes so, having convinced the old cylinder to let go of the backplate, a quick wire brushing and a couple of coats of Hammerite smooth turned this:  into this:  In between coats, new rigid pipes were made up for the o/s and the first of the n/s. You can't seed the one to the n/s cylinder but it's all nice new and shiny:  At this rate, I reckon another good day will see the brakes done, maybe 2 if I pause to paint the suspension while I'm under there. Then it'll be time to pull the driver's door off for some fairly major surgery pre-painting |
|


 ;D
;D