|
|
Post by alexspbru on Nov 29, 2019 10:34:39 GMT
You have very good modifications!
I ask your new wheels. Where can I order?
Grateful
|
|
|
|
Post by swissdave on Nov 29, 2019 11:56:15 GMT
You have very good modifications! I ask your new wheels. Where can I order? Grateful Thank you. Unfortunately the wheels cannot be ordered ready to fit the Daf, you have to modify them, change the position of the holes. See; dafcars.proboards.com/thread/2832/renault-alloy-wheels |
|
|
|
Post by swissdave on Dec 13, 2019 15:37:40 GMT
Lots of work going on in the garage but not too much to show. I have changed the oil pickup and sump to the Volvo 66 versions fitted to the original engine. When I built this engine originally I used the donor Gordini engine oil pump with the V340 pickup and sump. This worked fine except that the sump is much lower on a 340 and was the lowest point of the car. This combined with the lowered suspension made the risk of hitting the sump on something more likely. I’m much happier now the shallow Daf type sump is on it. The engine is on a stand and I have had the crankshaft pulley modified to drive the supercharger, next job is to make the mounting bracket for the Rotrex. 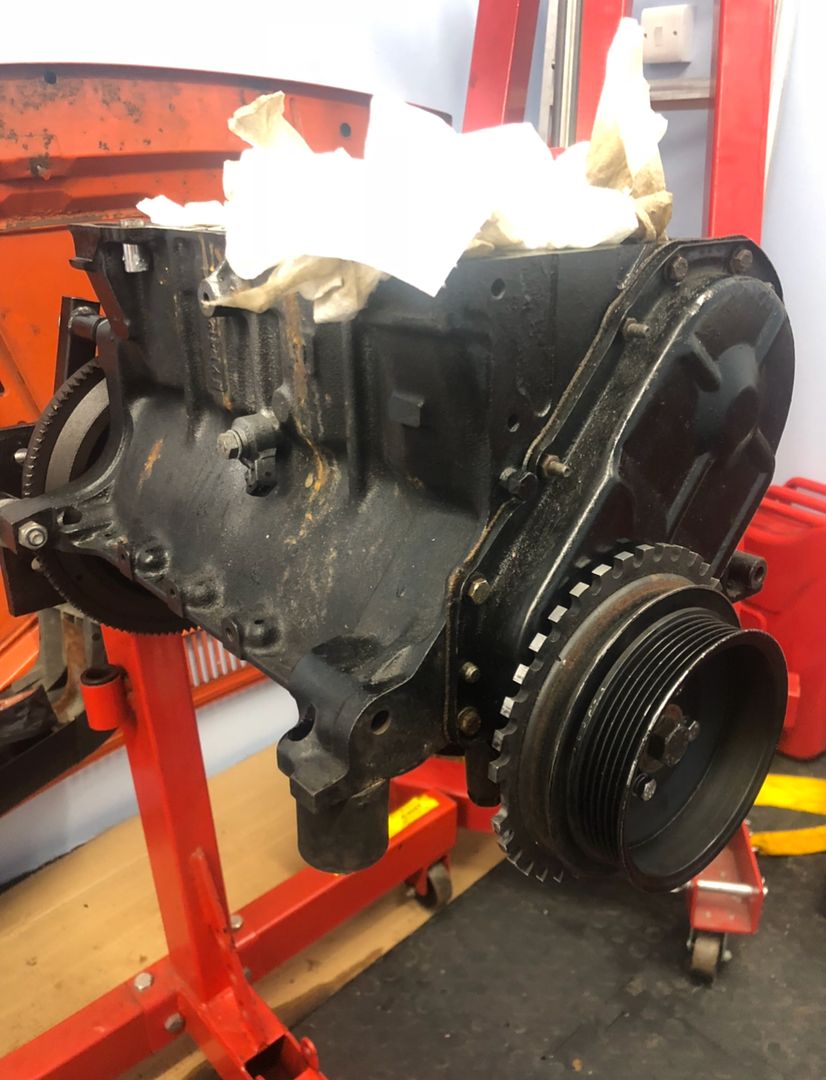 As I will be mounting this where the alternator has been up until now I have mounted the alternator on the exhaust side like on a Daf 55. 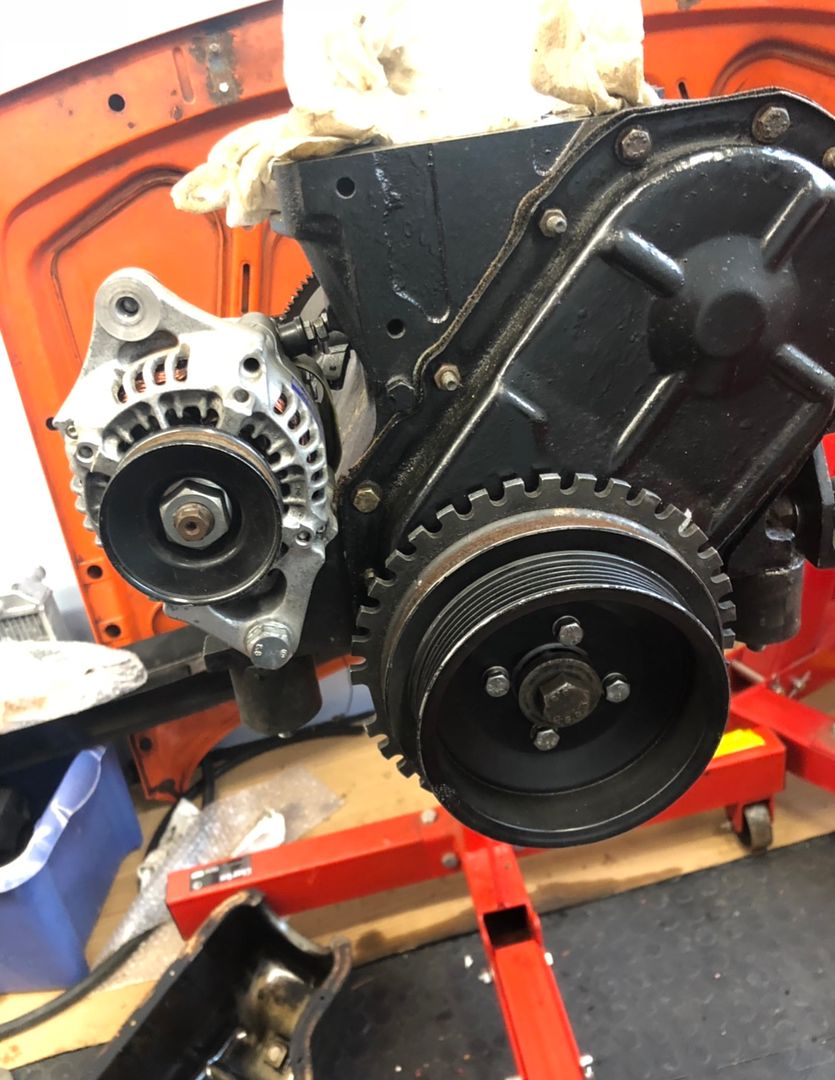 The cylinder head is about halfway through having the combustion chambers enlarged with my trusty dremel in order to lower the compression ratio slightly to suit the new spec. More soon! |
|
|
|
Post by Nick the man with a daf.... on Dec 14, 2019 22:48:58 GMT
hi mate, I would have thought using a spacer plate would be better than fluffing about with the chambers on the head, just in case it doesnt work? good project though
|
|
|
|
Post by swissdave on Dec 15, 2019 13:18:23 GMT
Hi Nick, I have heard about using stainless spacers but the guy I got the big bore engine kit from suggested this route
He said that removing metal from the area I am will also unshroud the inlet valve and help breathing as well as lowering the CR.
It is a bit scary but I am going very slowly using only small sanding drums in the Dremel.
|
|
|
|
Post by Nick the man with a daf.... on Dec 15, 2019 21:27:12 GMT
long as you measure the capacity of the chamber afterwards and they are all the same I suppose it will be alright, non reversible though
|
|
|
|
Post by Nick the man with a daf.... on Dec 17, 2019 18:41:19 GMT
you would probably find wet cutting with a burr more effective as aluminium clogs sanding material rather fast, or maybe see if you could get some with zirconium media on
|
|
|
|
Post by newwy66 on Jan 8, 2020 22:39:41 GMT
Very impressive ...just looked through this post and in awe at your mods. Very nice 66 you have there. Love the colour.
I would like to make a few minor modifications (not on your scale!) maybe just to 'modernise' my 66 a bit. Was thinking slightly firmer shocks and mine has 3 blanked holes in the console just above the gear lever...man they need filling with some gauges and dials. Any recommendations on the shocks?
|
|
|
|
Post by swissdave on Jan 9, 2020 19:43:06 GMT
Any recommendations on the shocks? I struggled to find any, in the end I used Gaz adjustable shocks, coil over ones at the rear with very light 50lb coil springs to help the leaf springs. Front was a real pain the way I did it using Volvo 340 “short” Gaz ones with specially made spacers etc. The Gaz shocks are available from Dai at www.classicswede.co.uk/300_series/cat1733345_1580904.aspxI think Koni are available as a direct bolt on replacement upgrade through a guy in Holland known to the the Dutch Daf owners club but are very expensive. Koni are excellent though.. Regards, Steve 😉 |
|
|
|
Post by newwy66 on Jan 9, 2020 19:55:18 GMT
Hi Steve
Thanks for the info. Sorry, I called you Andrew...getting mixed up with the other member. lol
|
|
|
|
Post by swissdave on Jan 11, 2020 9:43:37 GMT
After lots of hassle the new fuel system for the fuel injection is nearly finished. I am using a low pressure lift pump to fill the swirl pot which acts as a resovoir for the main high pressure fuel pump to draw from. 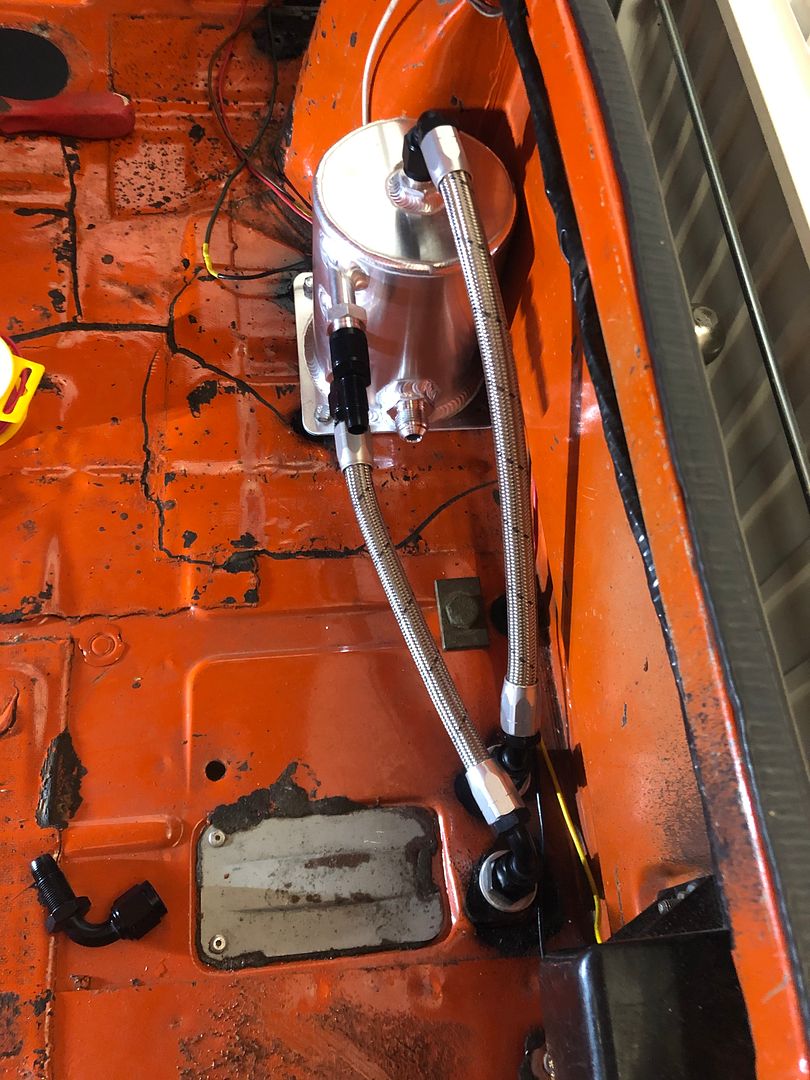 The swirl pot has to have a return to the main fuel tank and for this I have adapted a hydraulic banjo fitting. 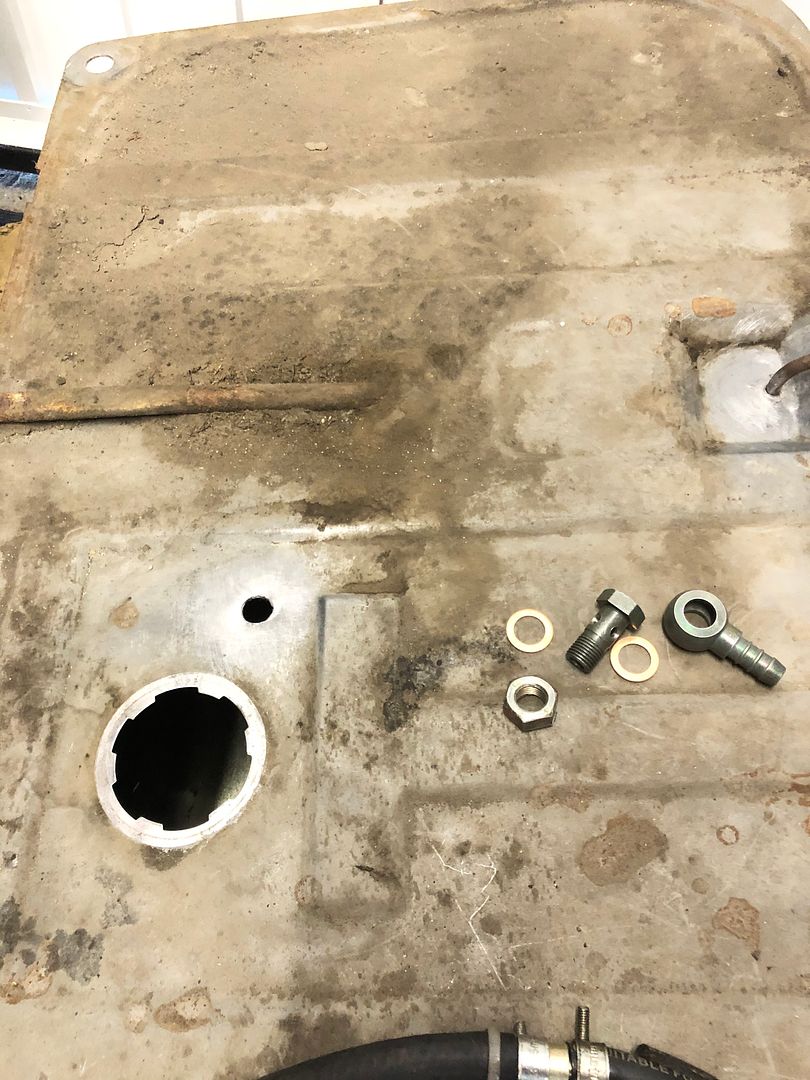 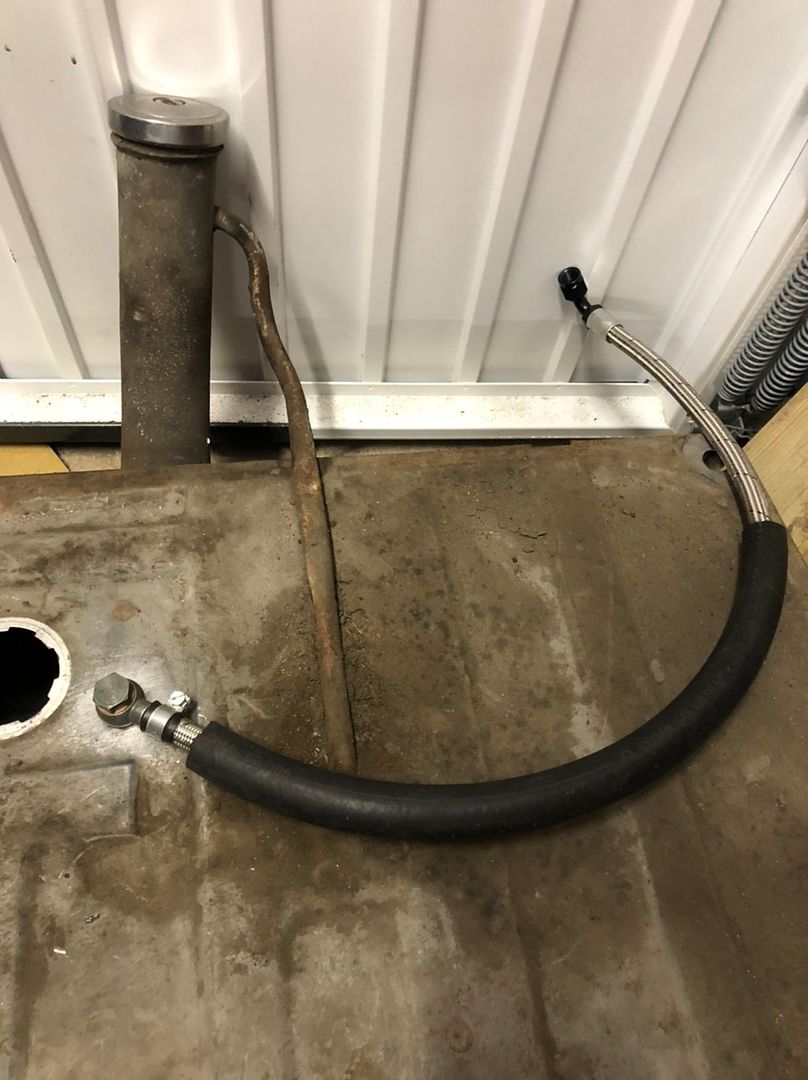 For the fuel supply and return to the engine bay I have used braided Goodridge PTFE hose with all threaded fittings 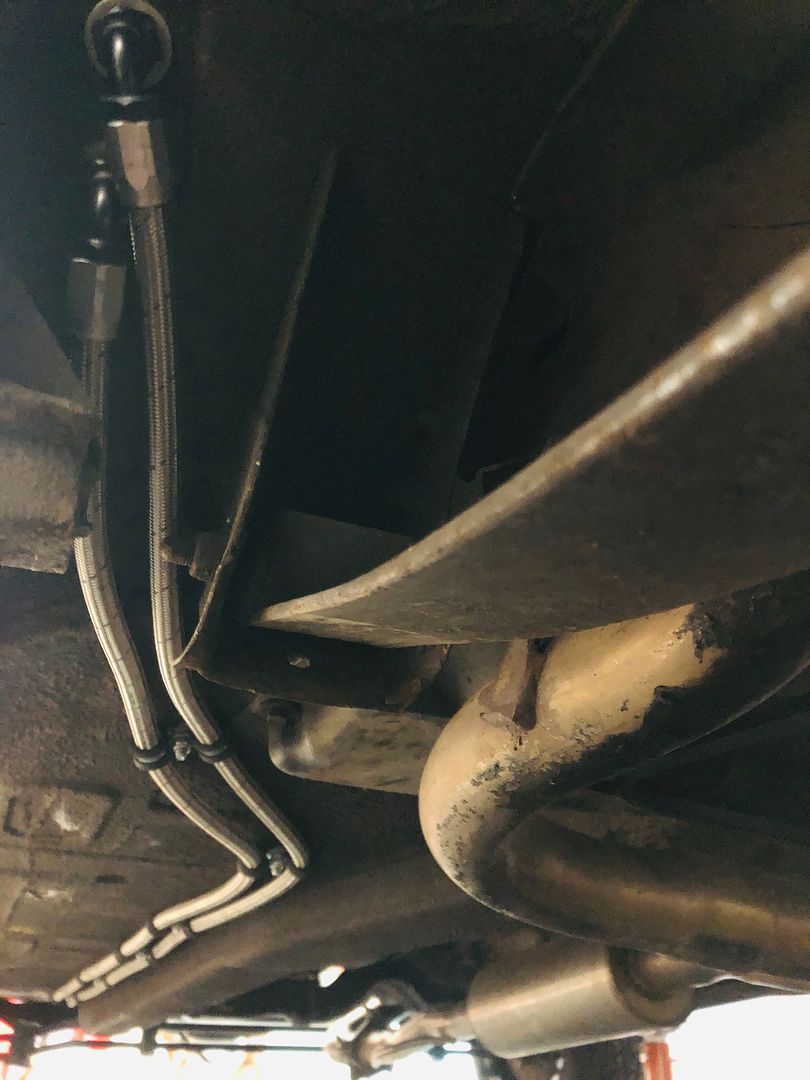 More soon, I have made a wooden version of the supercharger mounting and a friend is currently making one from 8mm mild steel, once this is done the engine is close to going back into the car. |
|
|
|
Post by swissdave on Jan 15, 2020 22:20:01 GMT
|
|
|
|
Post by newwy66 on Jan 15, 2020 22:24:31 GMT
I wish I had your skills! Great work you are doing there.
|
|
|
|
Post by swissdave on Feb 12, 2020 21:39:16 GMT
After a couple of weeks struggling to get anything completed everything has come together at once this week with several small but significant finishing off jobs. The head is back from a slight skim after I removed some of the combustion chambers and measured and made them equal. I have bought an uprated head gasket from Automecca in France which is also 0.5mm thicker than standard and is specifically made for skimmed heads. The final job for the injection system was to mount the fuel rail and today I picked up the new alloy brackets to fit the rail to the plenum, this was a tricky job as the injectors all need mounting perfectly straight and secured to stop the boost pressure blowing them out. I had made three different cardboard designs but wasn’t happy with any of them. I visited my friend Paul that made the plenum, last weekend and within 2 minutes he had solved the puzzle and mocked up some brackets in tin. A proper old school engineer and fabricator is always impressive to observe.😄 And finally the supercharger bracket had to have another little adjustment to straighten the tensioner mounting surface, my farmertech mate cut, hammered and welded the bracket and now everything on the belt drive looks lovely and straight. I would like the engine back into the car next week and then it’s really only fitting the new pre-made wiring loom to the engine before first start time. Some pics; The supercharger bracket is attached to the block by three high tensile studs in factory standard drilled mounting bosses on the B14 block with stainless spacers 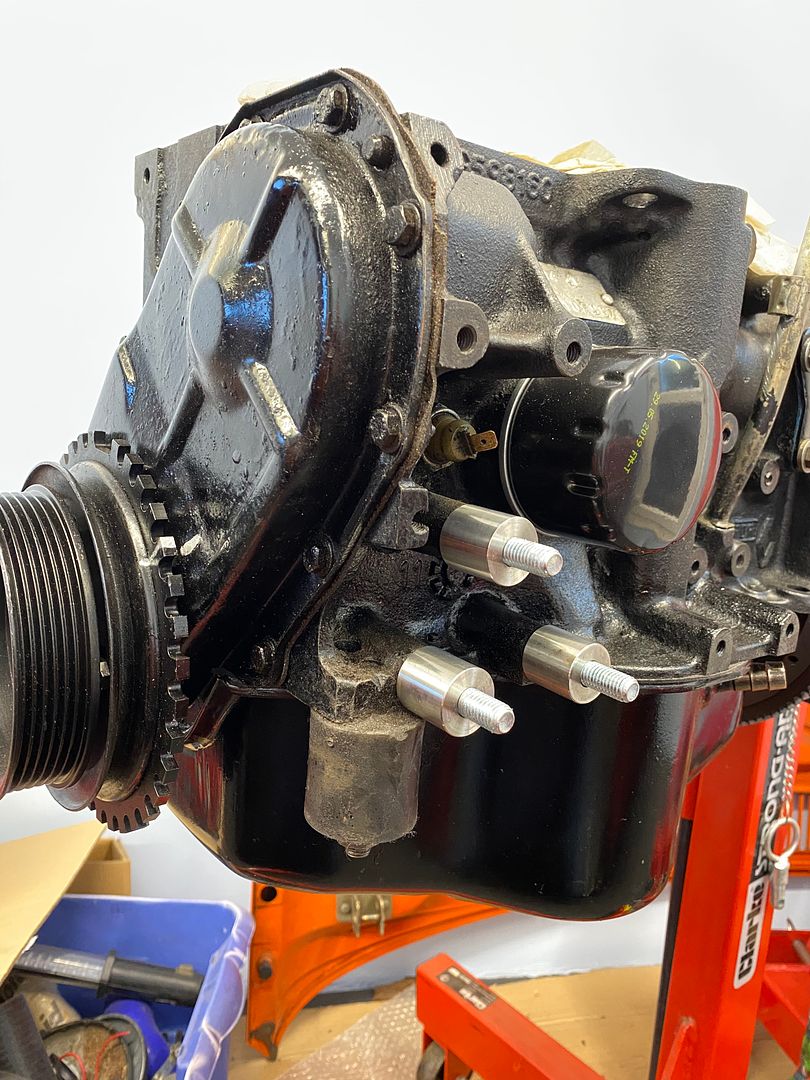 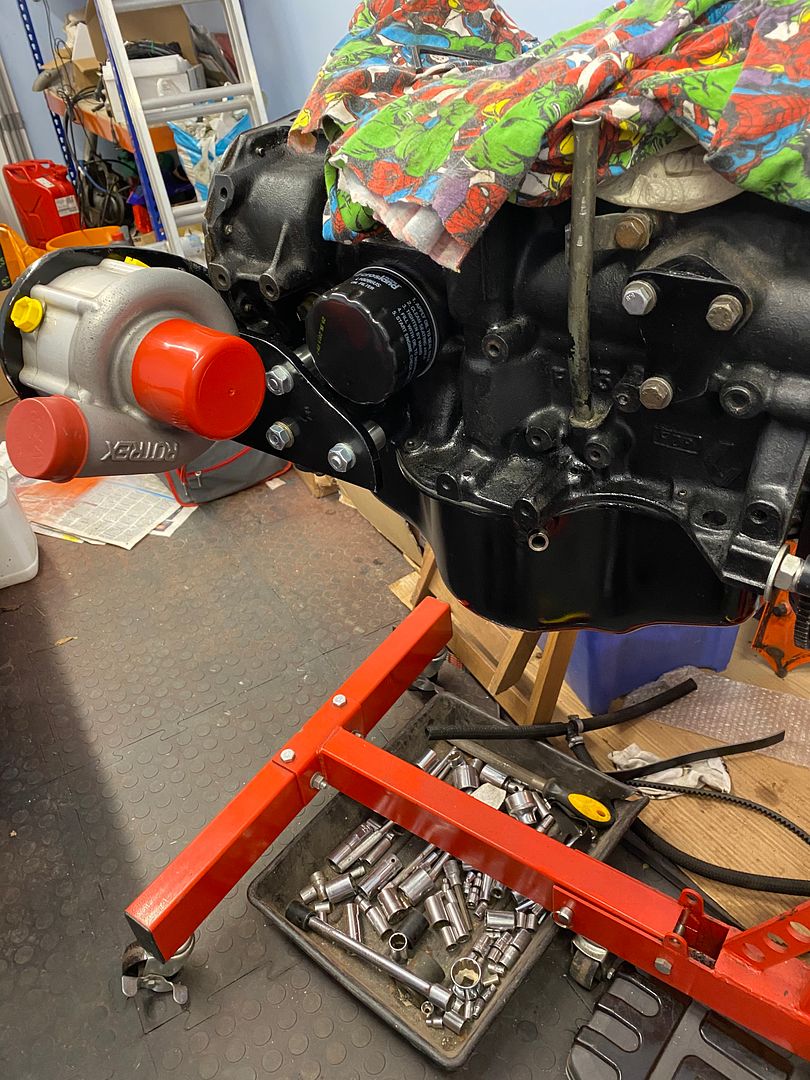 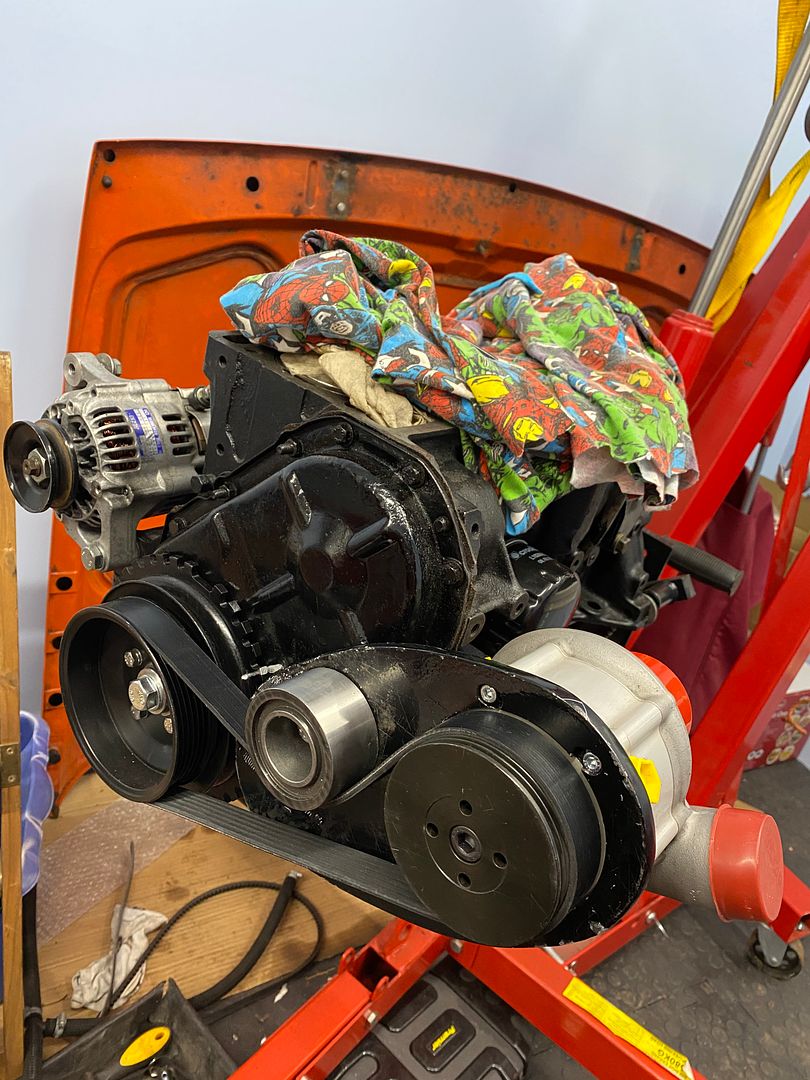 |
|
|
|
Post by newwy66 on Feb 12, 2020 22:10:41 GMT
wow...great work. When can I book my 66 in for a few mods?
|
|
|
|
Post by swissdave on Feb 15, 2020 0:03:40 GMT
The head is back on! I found the receipt for the work and the skim was only 8 thou or 0.2mm. This is great news, I’d asked for the very minimum skim they could do and this with the 0.5mm thicker head gasket means that I’ve gained a bit more extra volume in the combustion chambers to help lower the compression ratio. 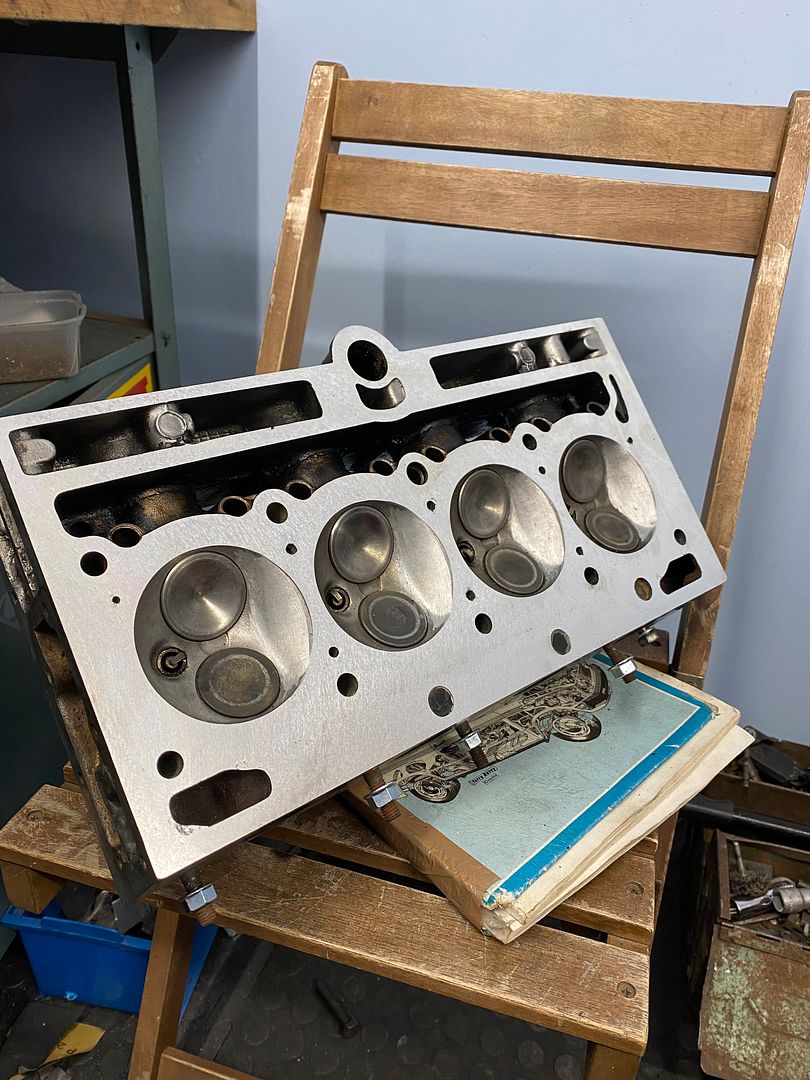 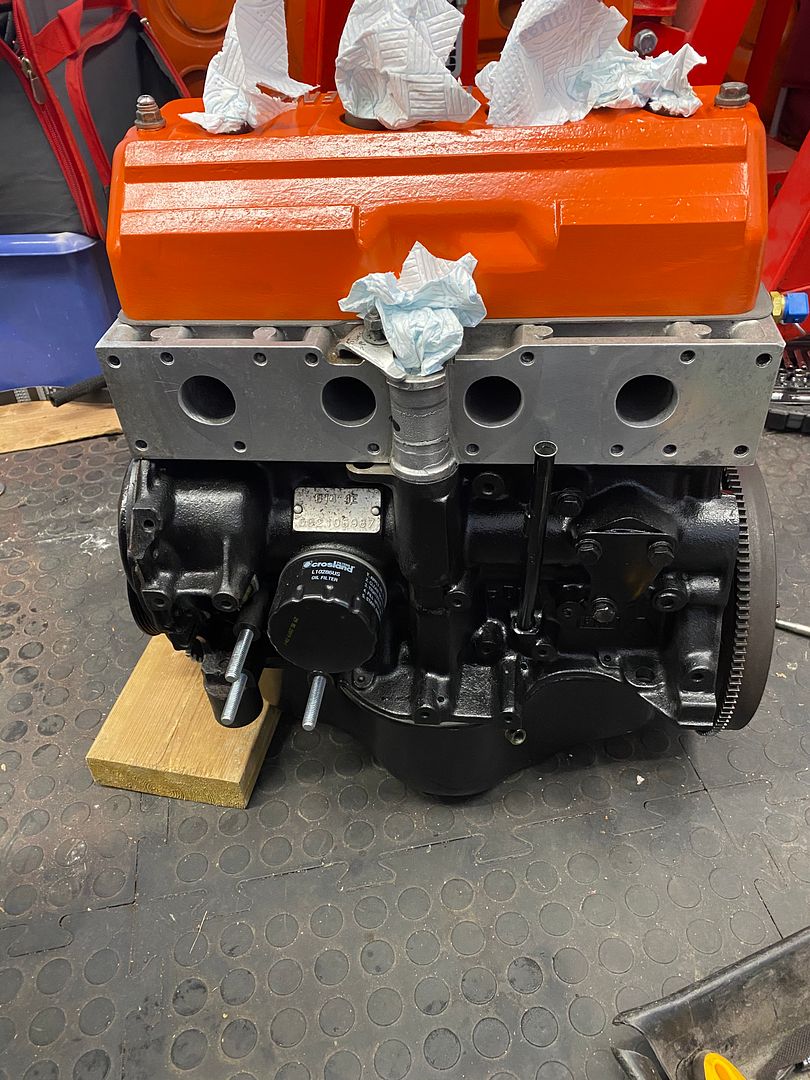 I’m also half way through replacing the oil in the primary part of the gearbox, the level/fill plug was leaking a bit so I decided to change the oil at the same time, unfortunately my garage upgrade meant everything had to go into storage for a few months while the new garage was built and my huge pack of copper washers is one of the missing items. I bet Halfords don’t have the correct size without buying another huge pack. Fitting the clutch and bellhousing next. |
|
mattsdafs
Likes DAFs
Yolanda, 55 estate
Posts: 374
|
Post by mattsdafs on Feb 15, 2020 0:44:57 GMT
Good luck with that 1 Steve..
Nice work on the engine and a good result on the head..might have to ask all specs 1 day 😉
|
|
|
|
Post by swissdave on Mar 4, 2020 21:42:13 GMT
Engine in this evening, now it’s time to fit all those new bits and pieces together, fit the new ECU wiring loom and see if everything works. 🤞 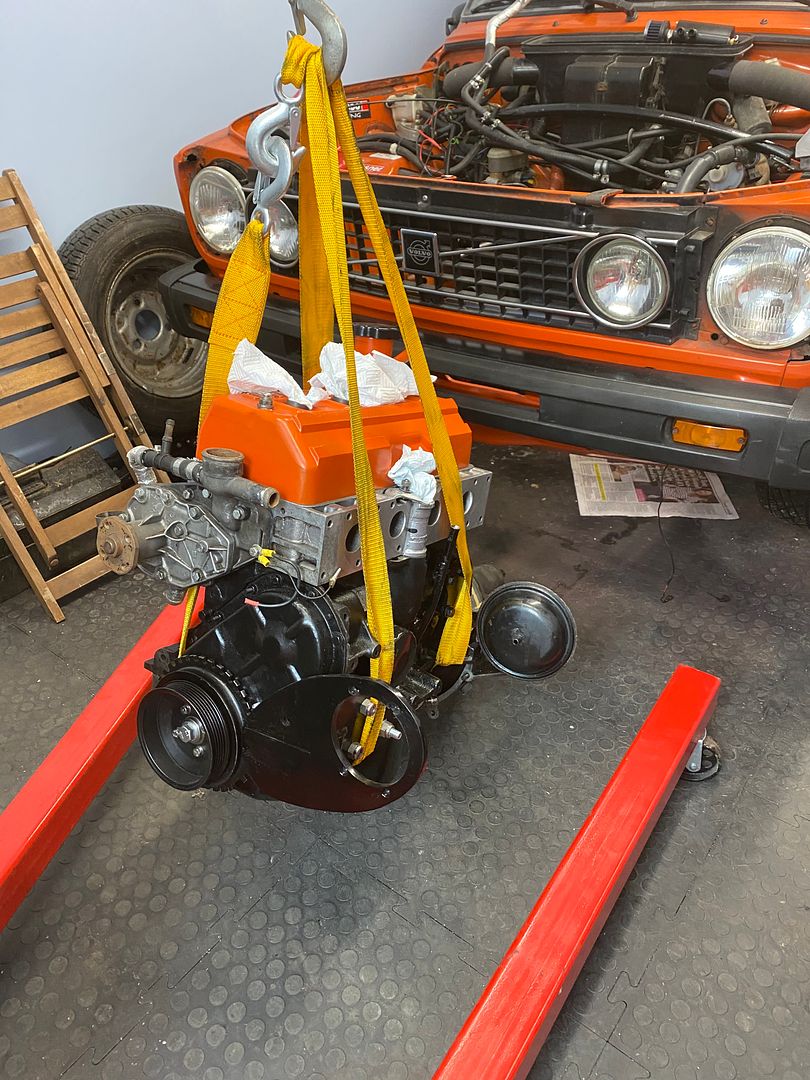 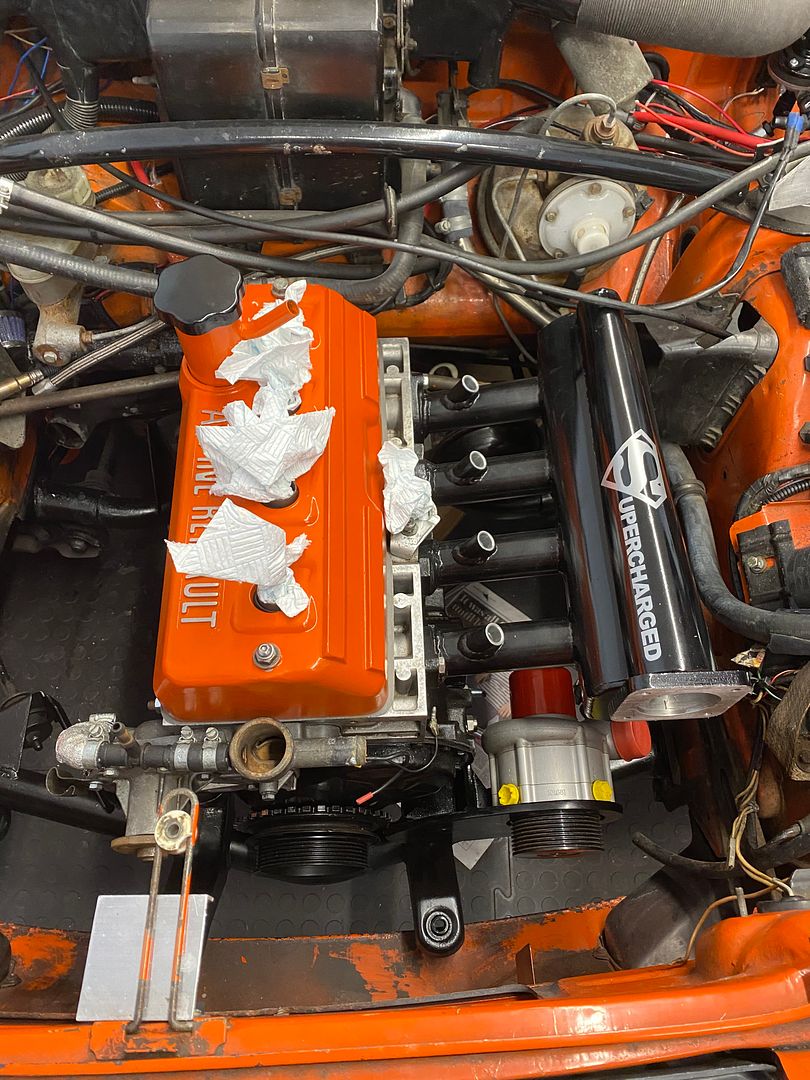 |
|
andrew
Likes DAFs
Posts: 1,111
|
Post by andrew on Mar 5, 2020 17:03:44 GMT
Can't wait.........
|
|
|
|
Post by newwy66 on Mar 8, 2020 13:11:37 GMT
Love the orange rocker cover..  Looking good. |
|
|
|
Post by swissdave on Mar 13, 2020 23:21:38 GMT
Over the last couple of weeks I have been planning the oil cooling system for the supercharger and the air supply routing from it to the throttle body inlet. The oil cooler will be mounted on the front of the engine subframe just ahead of the supercharger. The subframe will have a couple of 45mm exhaust clamps attached to mount the oil cooler to, it will be about here; 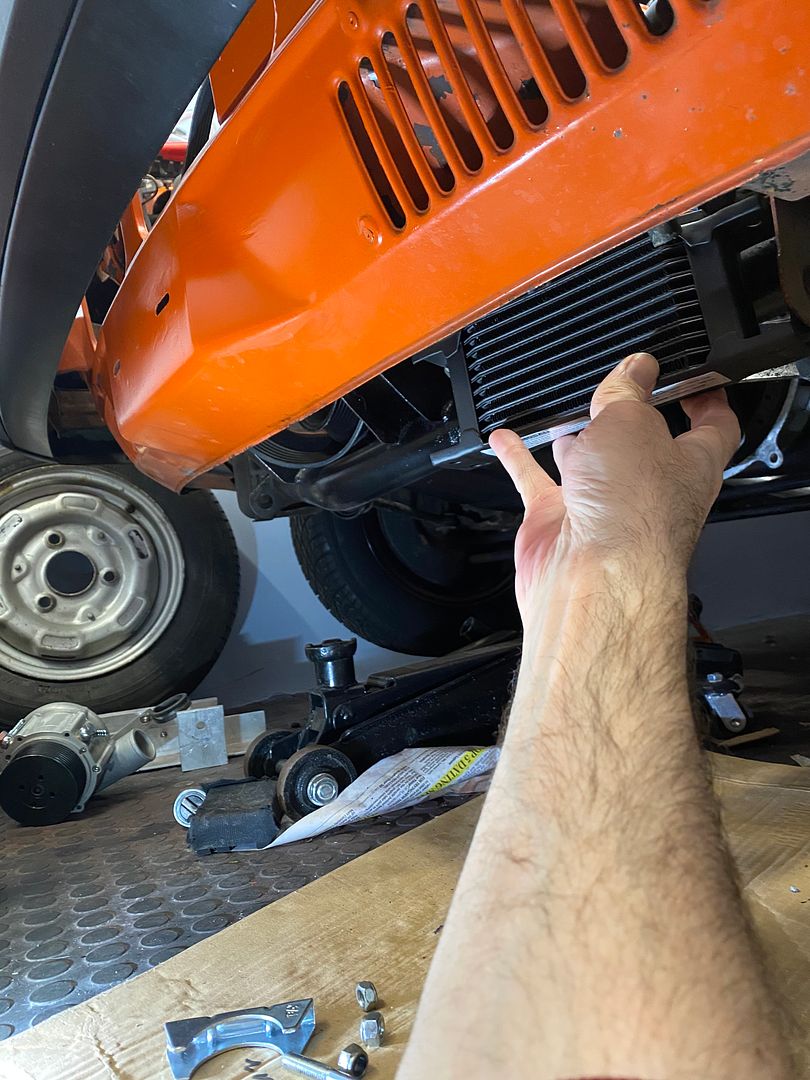 I recently found out that it is advisable to fit a dump valve/bypass valve in between the supercharger and the throttle body. Because the supercharger is being driven by the engine it is always making boost. This is great for throttle response but when the throttle is closed after accelerating there is nowhere for all that compressed air to go other than backwards through the supercharger which wears it out quickly. A dump valve which is plumbed into the intake duct will release all of that compressed air into the atmosphere when it senses a vacuum in the inlet manifold and will help the supercharger to last. I had to have a couple of boost hose joiners made anyway and my friendly welder has managed to bead them to hold the hoses on and make a t-piece to mount the dump valve which I collected from the pub earlier. 😄 I wish I could weld like this.  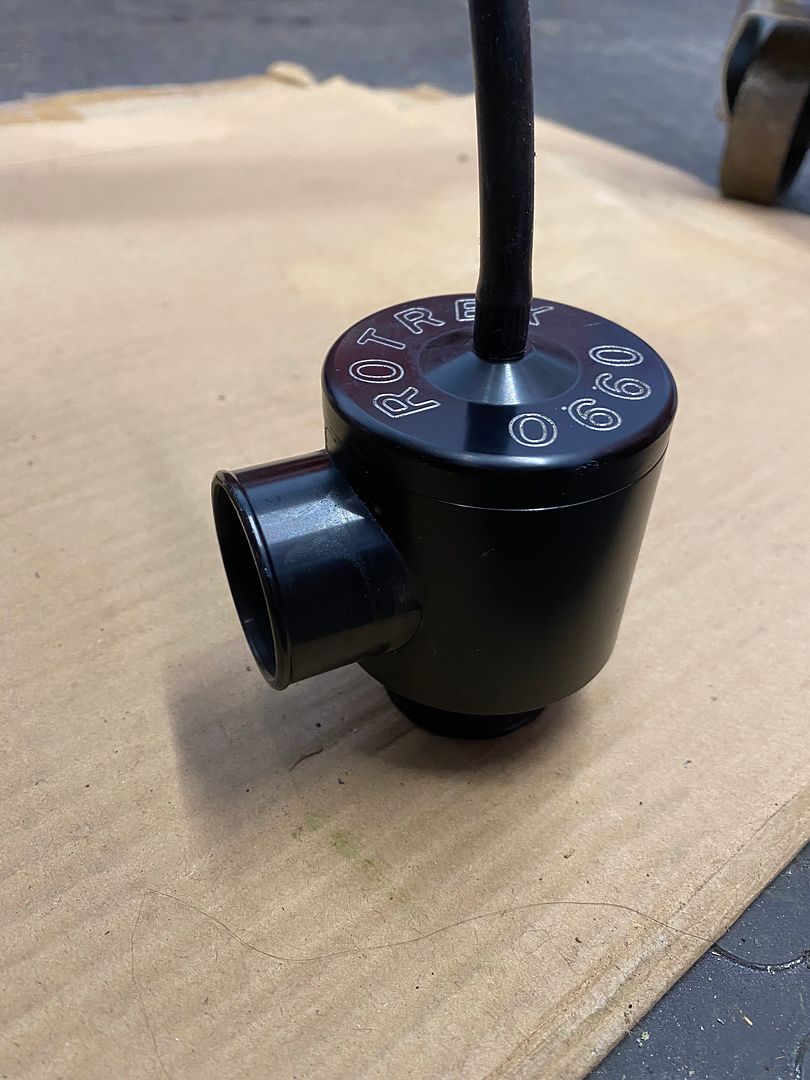 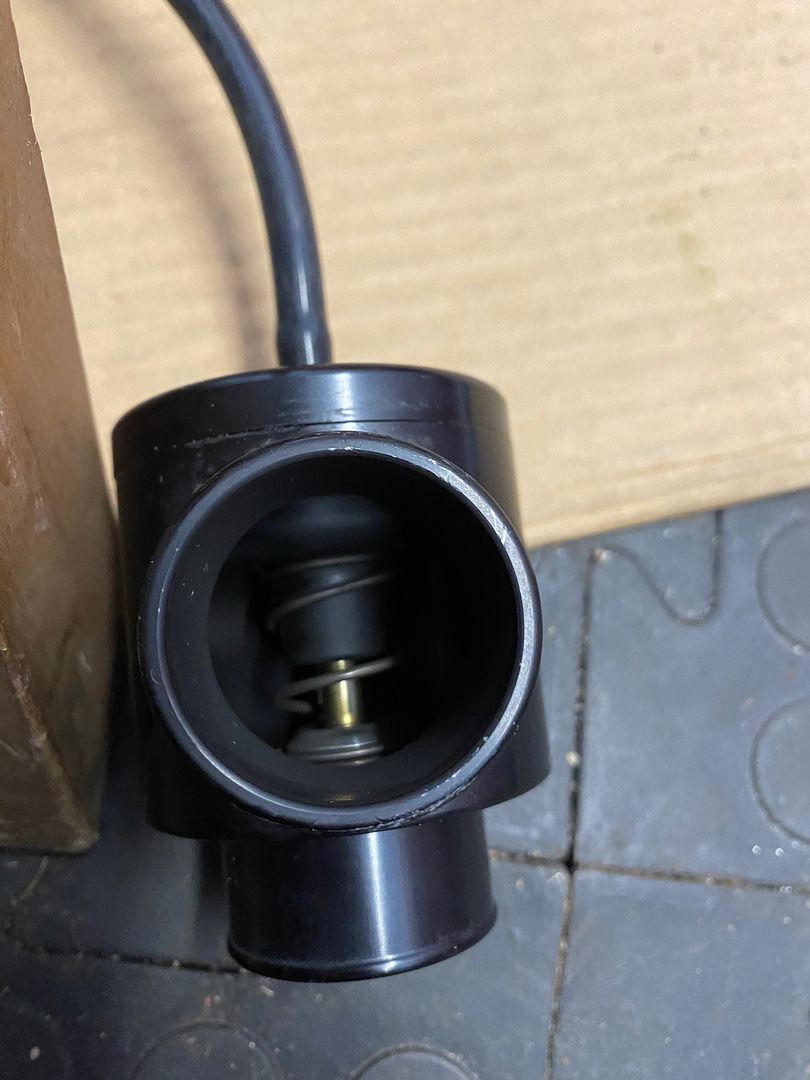 |
|
|
|
Post by swissdave on Apr 12, 2020 18:11:32 GMT
I managed to get a bit done today, I made some alloy mounting brackets for the oil cooler. 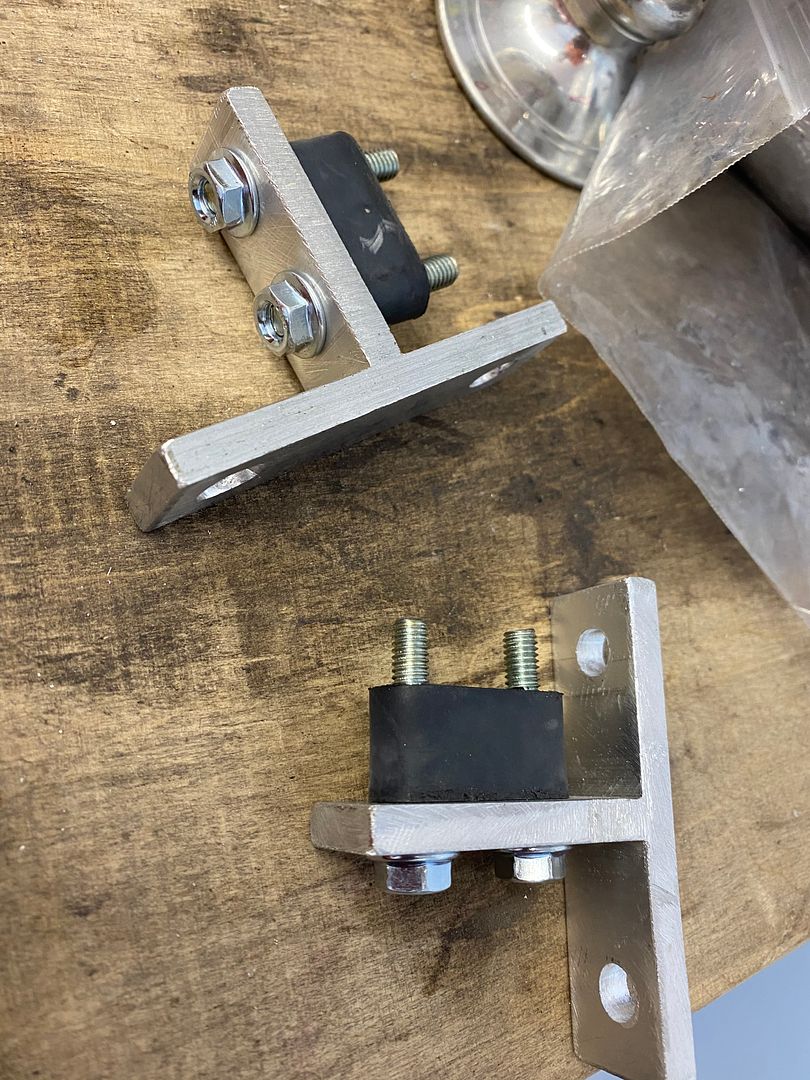 It is mounted onto the engine subframe 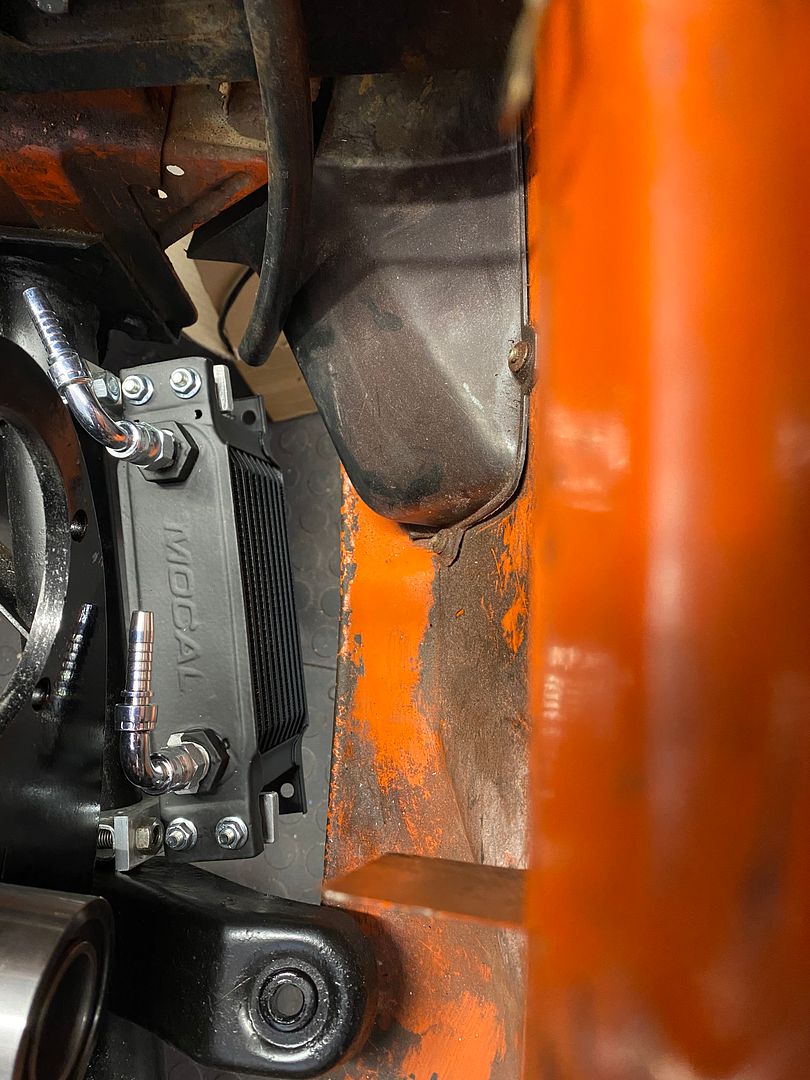 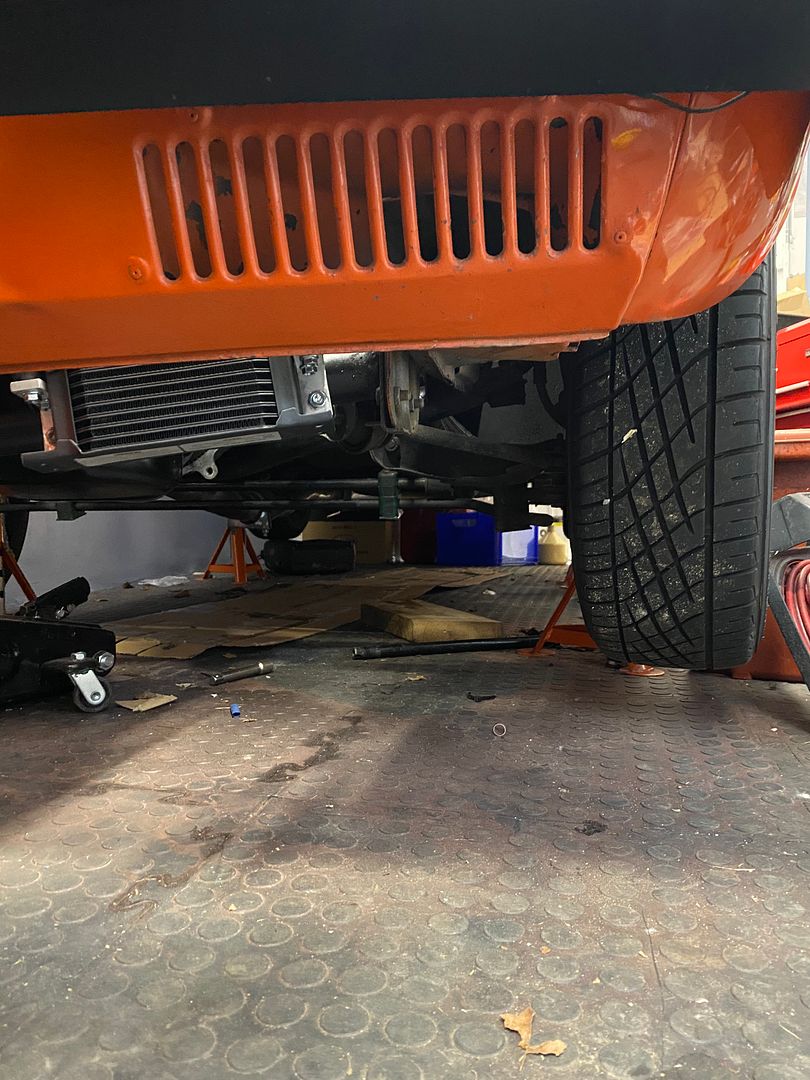 The supercharger needs an oil cooler, oil reservoir and a filter. This is all done now, once the supercharger is fitted I can fill the system with oil and bleed it. The “oil” it uses is a wierd blue and is called traction fluid, it’s also over £100 a litre.😱 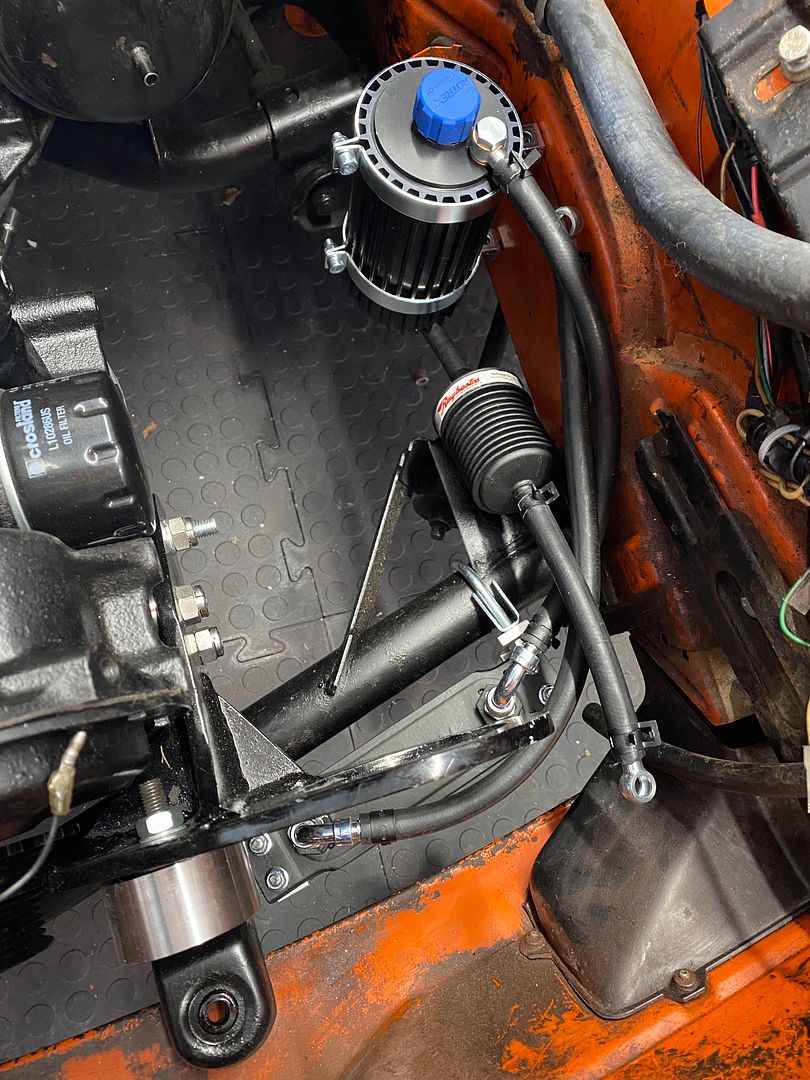 |
|
|
|
Post by swissdave on Apr 14, 2020 18:00:35 GMT
Really getting into it now. I’ve started the final fitting up of the fuel injection today, I’ve properly fitted the inlet, the throttle body I’ve used is from a Rover K series engine, they are cheap and widely used in this sort of application, the Emerald ECU will connect to the standard Rover throttle position sensor on it. The boost hoses are next, I've started cutting them to length and hopefully by the end of tomorrow the inlet plumbing will be done. Still loads of little fiddly things to sort but I can now see light at the end of the tunnel! 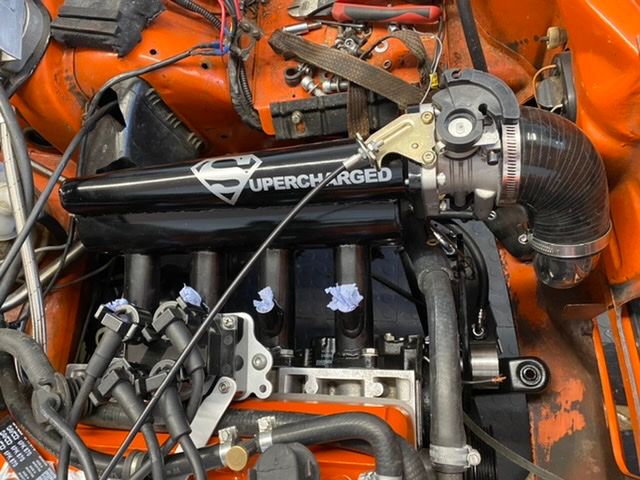 |
|
|
|
Post by swissdave on Apr 18, 2020 17:23:26 GMT
Boost hoses all fit in there but only just! I'm waiting on some Jubilee clips to finish the job. I had tried a couple of ways to fit an intercooler in there but it would only fit if it was stuck out the front of the car with it and the plumbing to and from it on show. I'm not keen on that style, I much prefer to keep the car looking as standard as possible. I'm going to try without one to start with, some people including TTS the UK Rotrex importers don't use one on low boost applications. I have a temperature probe in the inlet plenum with a display on the dash so that I can keep an eye on inlet temperatures and see if I will need to fit a cooler after all if it gets too toasty. I hope you can see what's what in the photos, 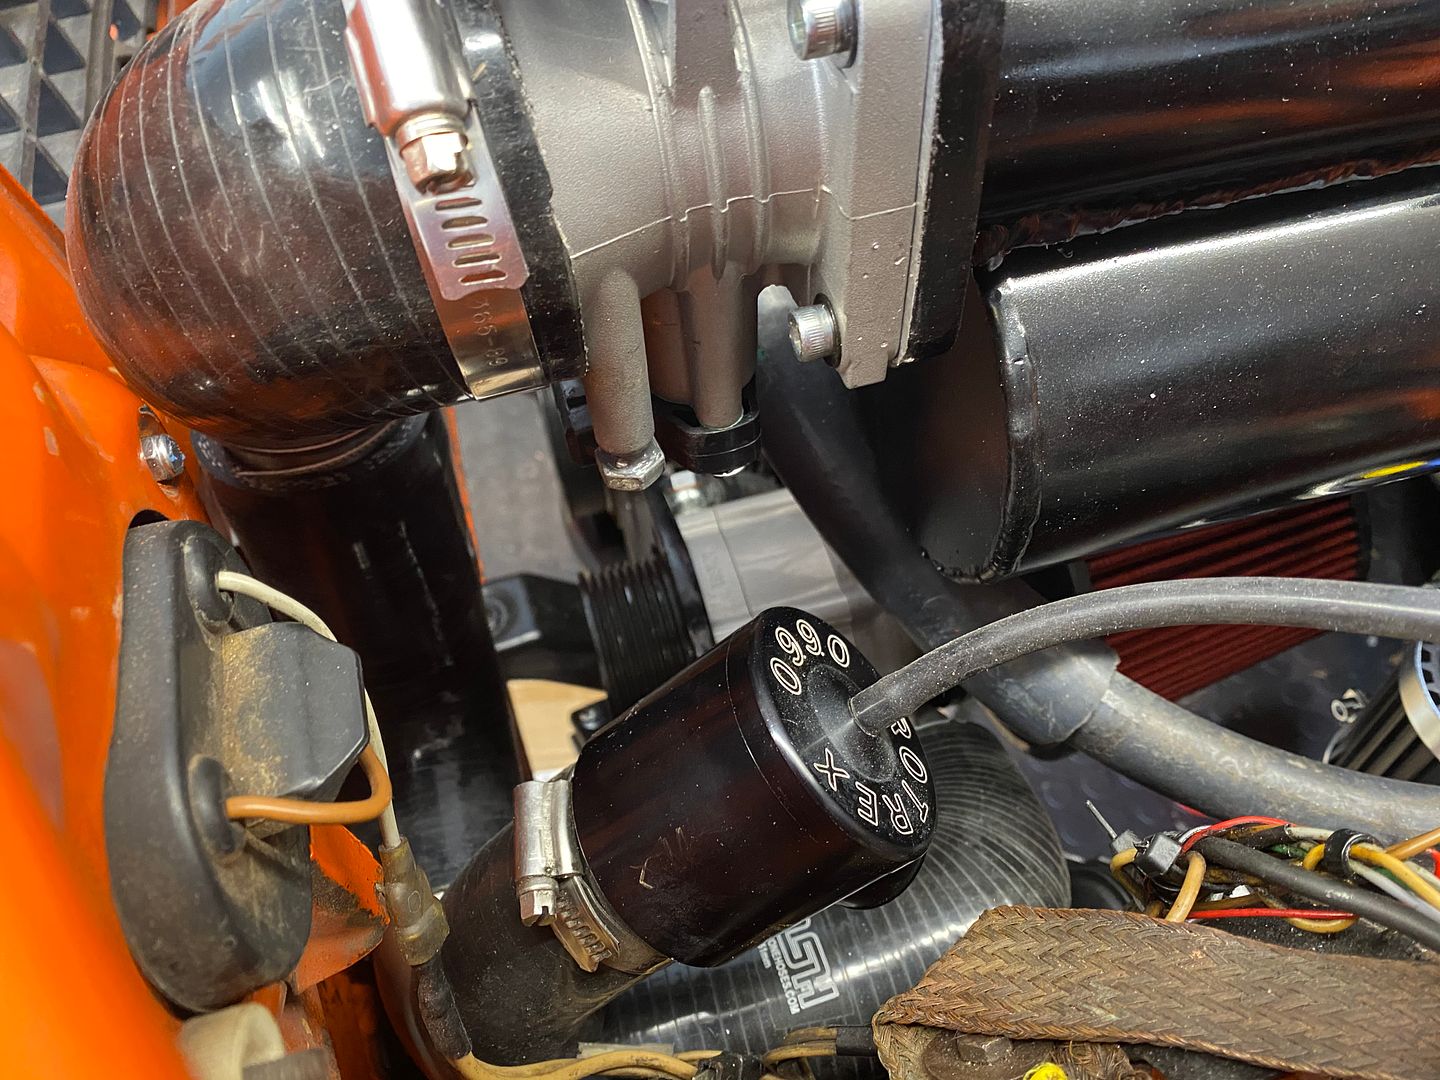 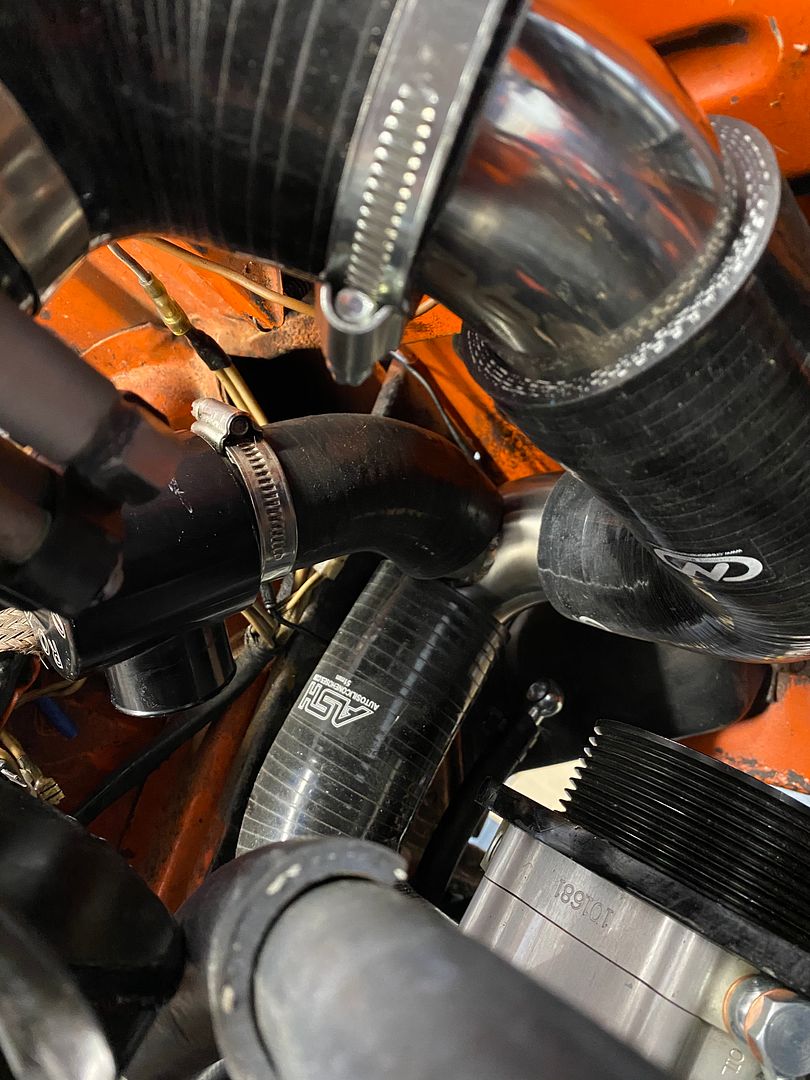 I've also made a bracket to mount the throttle switch for the Variomatic control valve. Eventually I will change the control of this to the new engine ECU but for the time being I have enough new stuff to cope with on the engine without worrying about the gearbox for now. 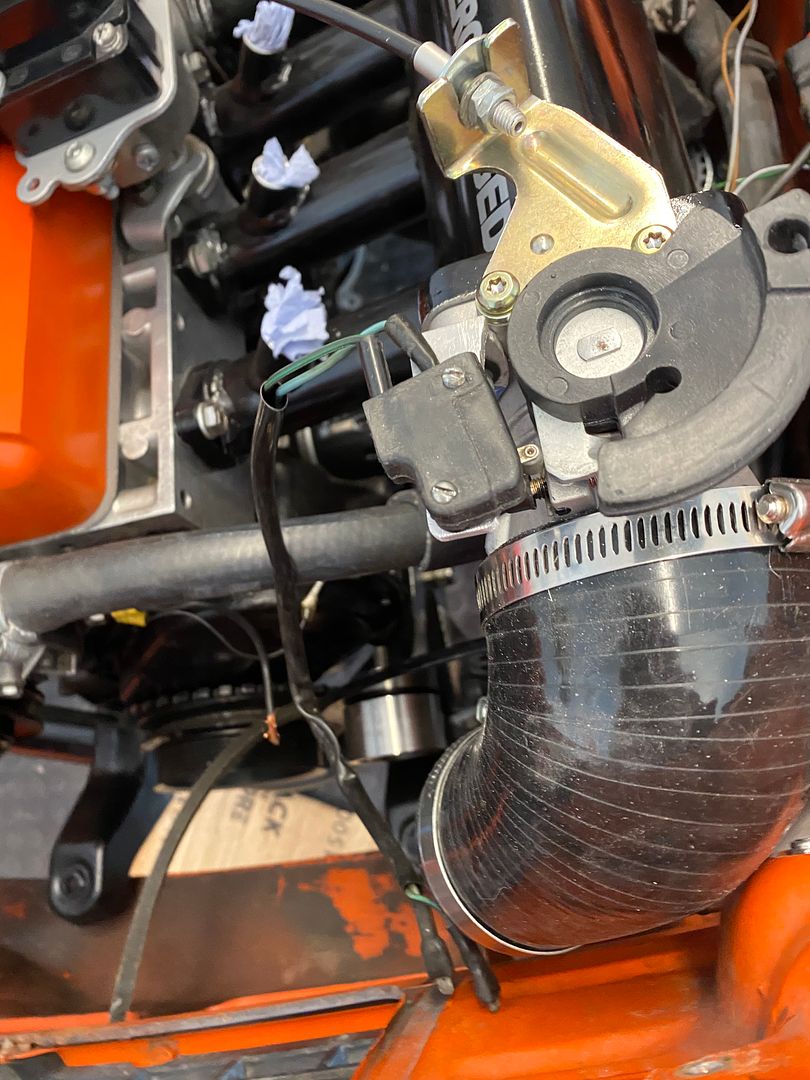 |
|
|
|
Post by swissdave on Apr 22, 2020 17:57:32 GMT
I finished off the fuel pipes today, the supply and return pipes in the engine bay and the fuel rail to feed the fuel injectors There are no injectors fitted in the picture, the loom for the ECU had a couple of incorrect connection plugs on it so has gone back to be altered, once back I can fit the injectors and then other than priming the system with fuel that part of it is done. 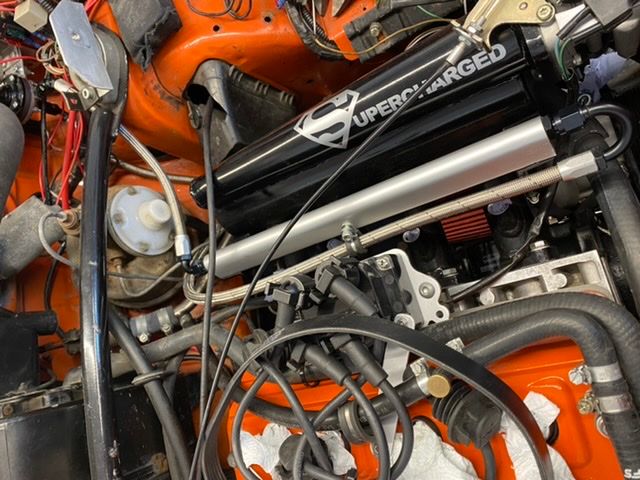 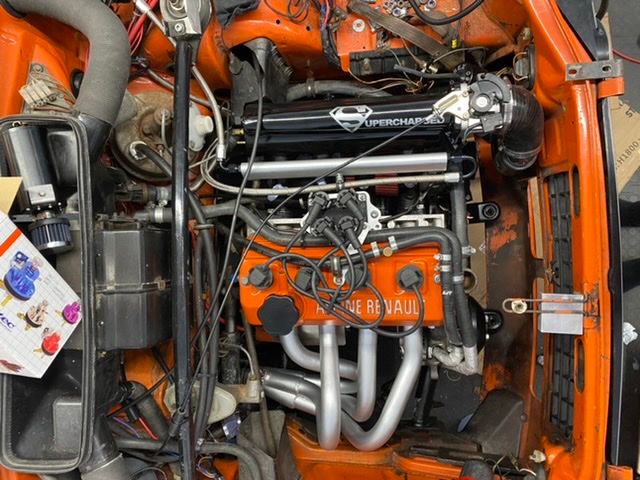 |
|
|
|
Post by swissdave on May 13, 2020 10:06:08 GMT
The loom is back with the correct connections on it now and I have made a hole to pass the ECU loom through the bulkhead so that the ECU can mount behind the centre console inside the car. The sensors are all connected in the engine bay. There are sensors for crank position, manifold pressure (MAP), throttle position, coolant temperature, inlet charge temperature and Lambda sensor in the exhaust. I'm still messing about with the alternator relocation, I've ordered a couple of fan belts which have been wrong and I hope the third that should arrive any day will be the correct length to work. Once that's in I can finish putting the cooling system back on. I've also changed a couple of the hoses for some new old stock ones I had. Another project I was going to look into later this year but have managed to get done now while my welding friend is quiet due to the lockdown, was an idea I got from a couple of our Dutch Daf fans that I met last year. They used a vacuum reservoir to make the ratio change up/down side of the variomatic work faster. On my car I'm using a 12v electric vacuum pump anyway for the gearbox rather than just using engine vacuum as standard and I have had an alloy tank made to fit between the pump and the vario, brake servo and clutch servo pipes. 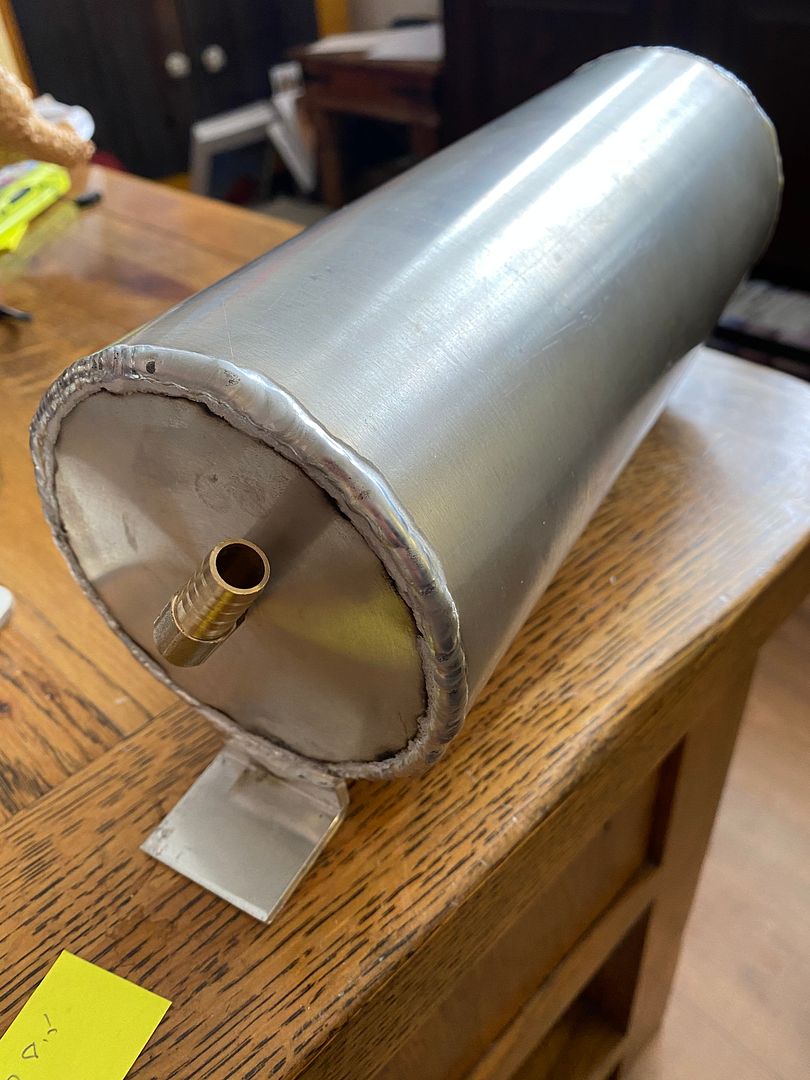 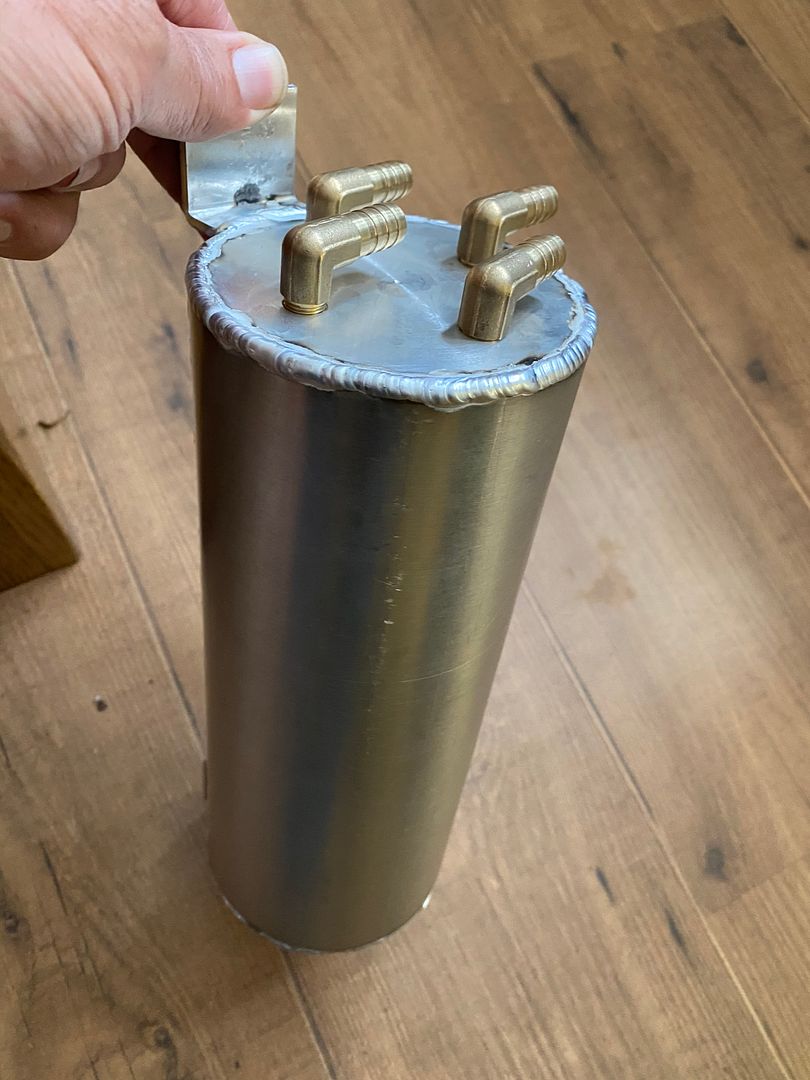 |
|
|
|
Post by andrejuan on May 13, 2020 11:26:06 GMT
That vac tank is a great idea. I look forward to seeing how it all fits together and the difference it makes
.
|
|
|
|
Post by swissdave on May 25, 2020 19:59:19 GMT
Lots done these last few days. Cooling system is all back together, the latest fan belt at 940mm was perfect, thank goodness as I was accumulating a fair stock of new fan belts! I have polished the vacuum reservoir and fitted it, in the photos you can see that I'm only using 3 of the 4 inlet ports, the 4th is blanked for now and may be used in the future for an extra vario control valve. Currently one goes to the original vario control valve, EMVK or whatever we call it in the UK. One to the brake servo and one to the clutch servo (V66 only). The injectors are in and wired, on google advice I used KY jelly to help the rubber seals on the injectors into the ports, much to 16yo Swissdave jr's disgust.😂 Very close now, it's only a few wires for the ECU and internal gauges away from first start up. Maybe later this week? 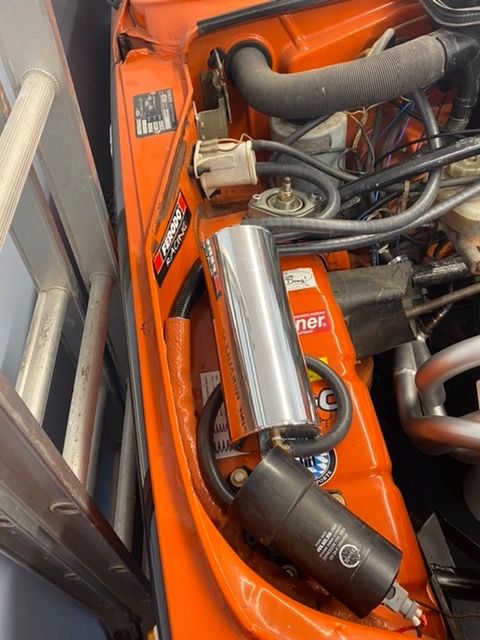 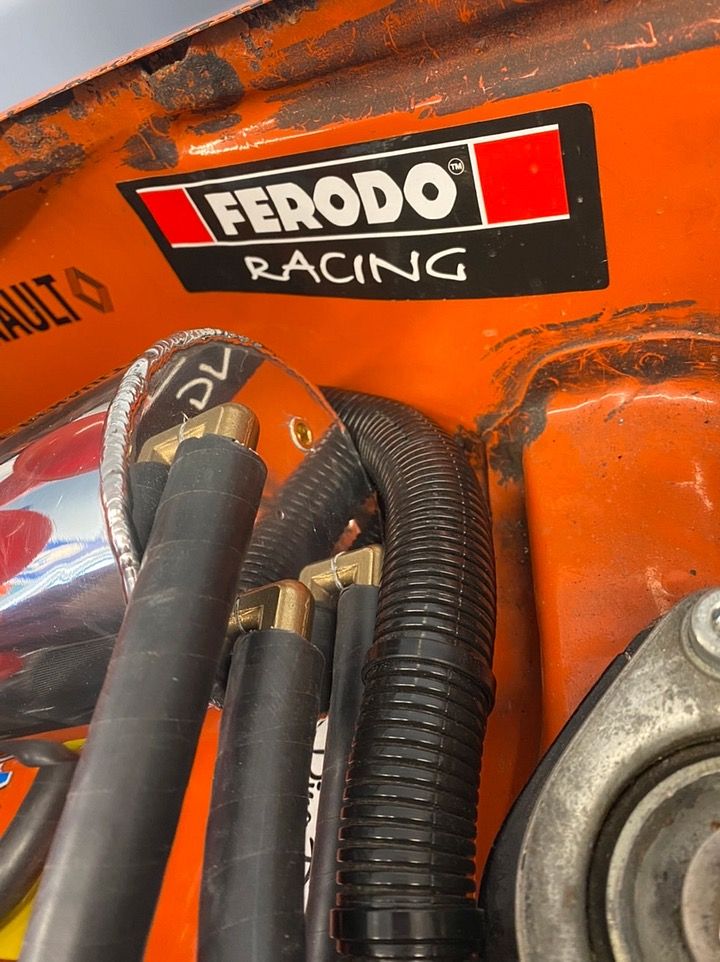 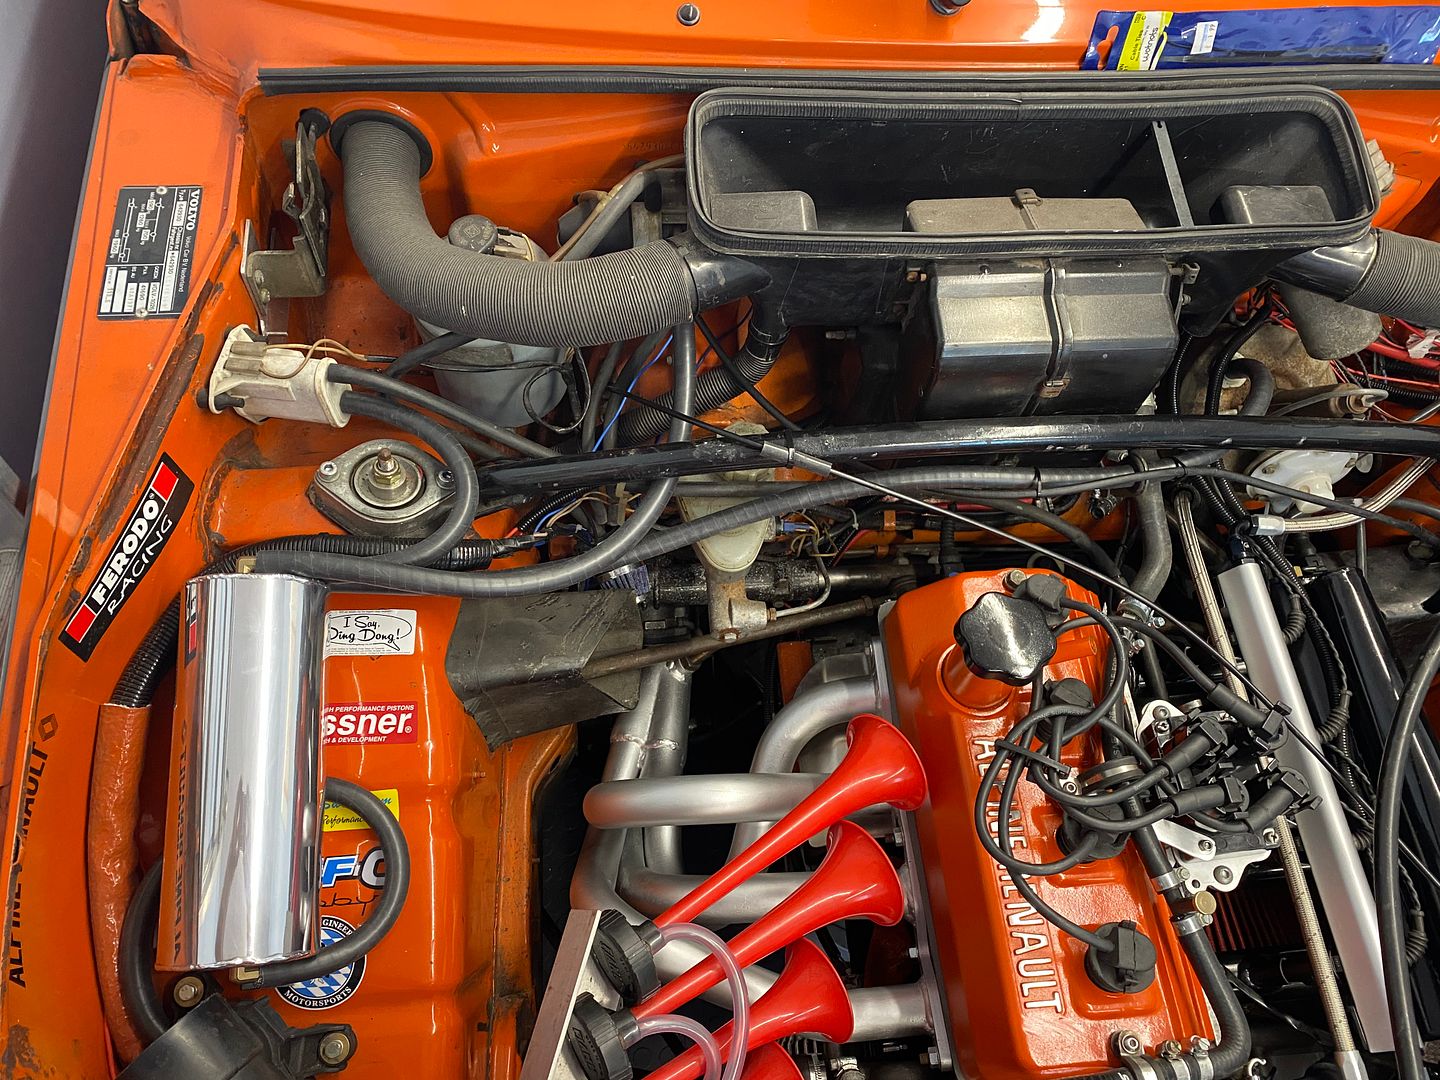 |
|
|
|
Post by swissdave on May 27, 2020 18:12:14 GMT
I have found a fantastic little intercooler small enough to fit within the front bumper. I spent a whole evening trawling through listings on eBay for a standard replacement intercooler of the correct size. A couple of suppliers have started putting dimensions on their listings which helps enormously. I had always thought there must be something suitable out there and in the end it's one from a Fiat Qubo. 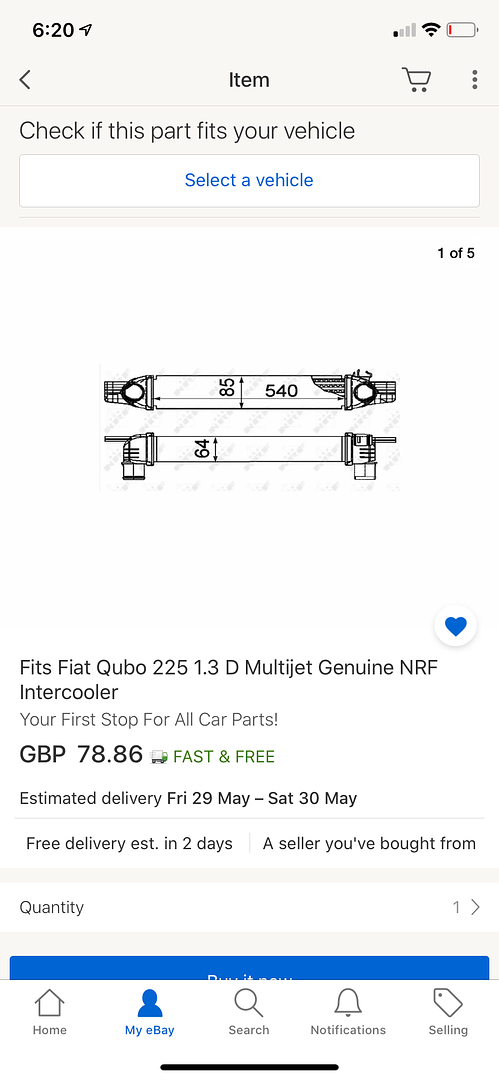 It is slim enough to fit inside the bumper and just the right length between the inlet and outlet to fit either side of the radiator. The inlets are also 45mm (most have 51 of 57mm) diameter, the same as the outlet from the supercharger and this slimmer hose size makes fitting the boost return pipe under the radiator a doddle. The only visible parts will be the boost hoses passing through the front bodywork panel but even these will be mostly hidden behind the bumper. 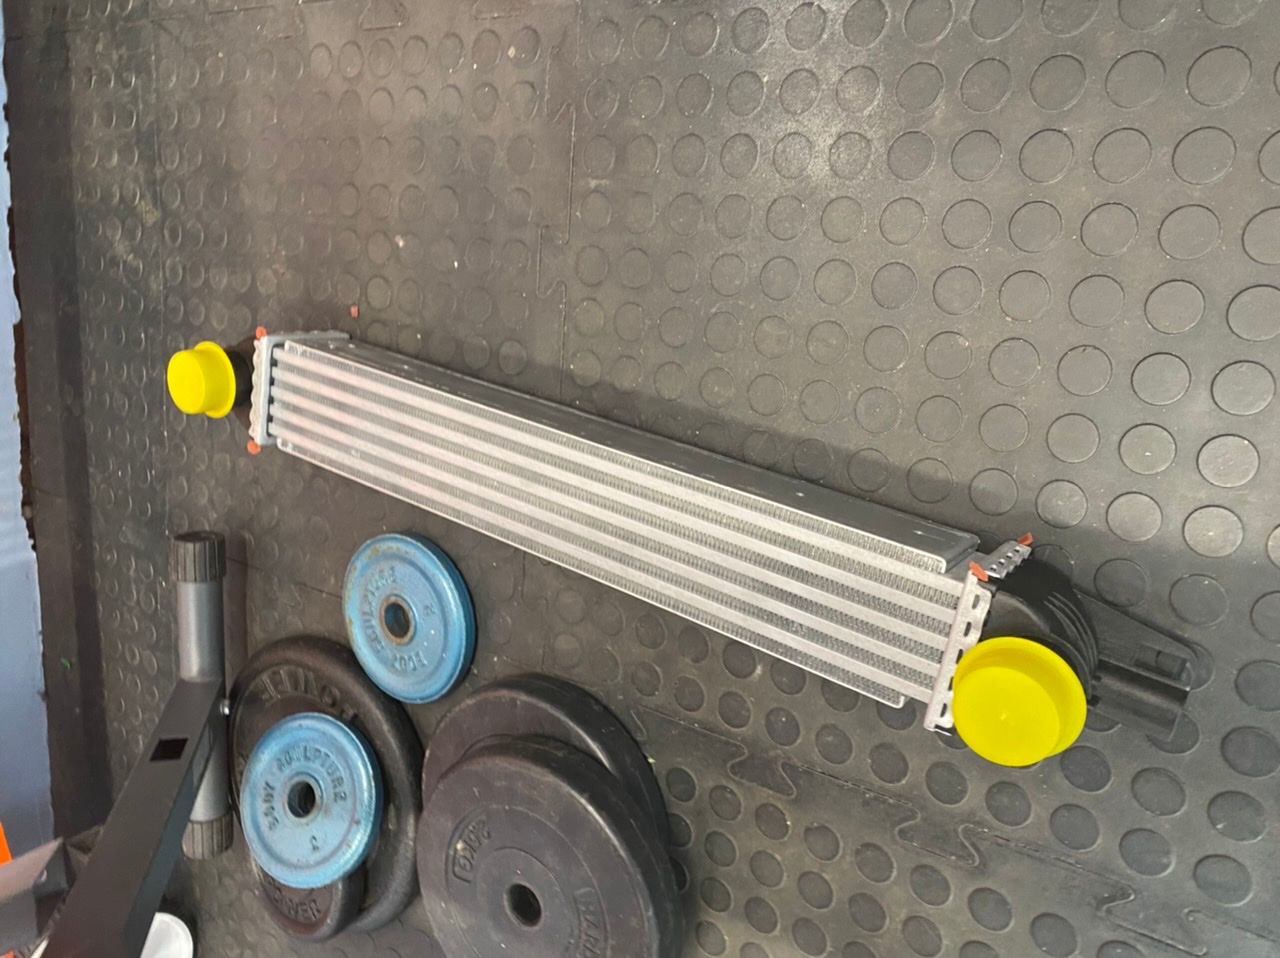  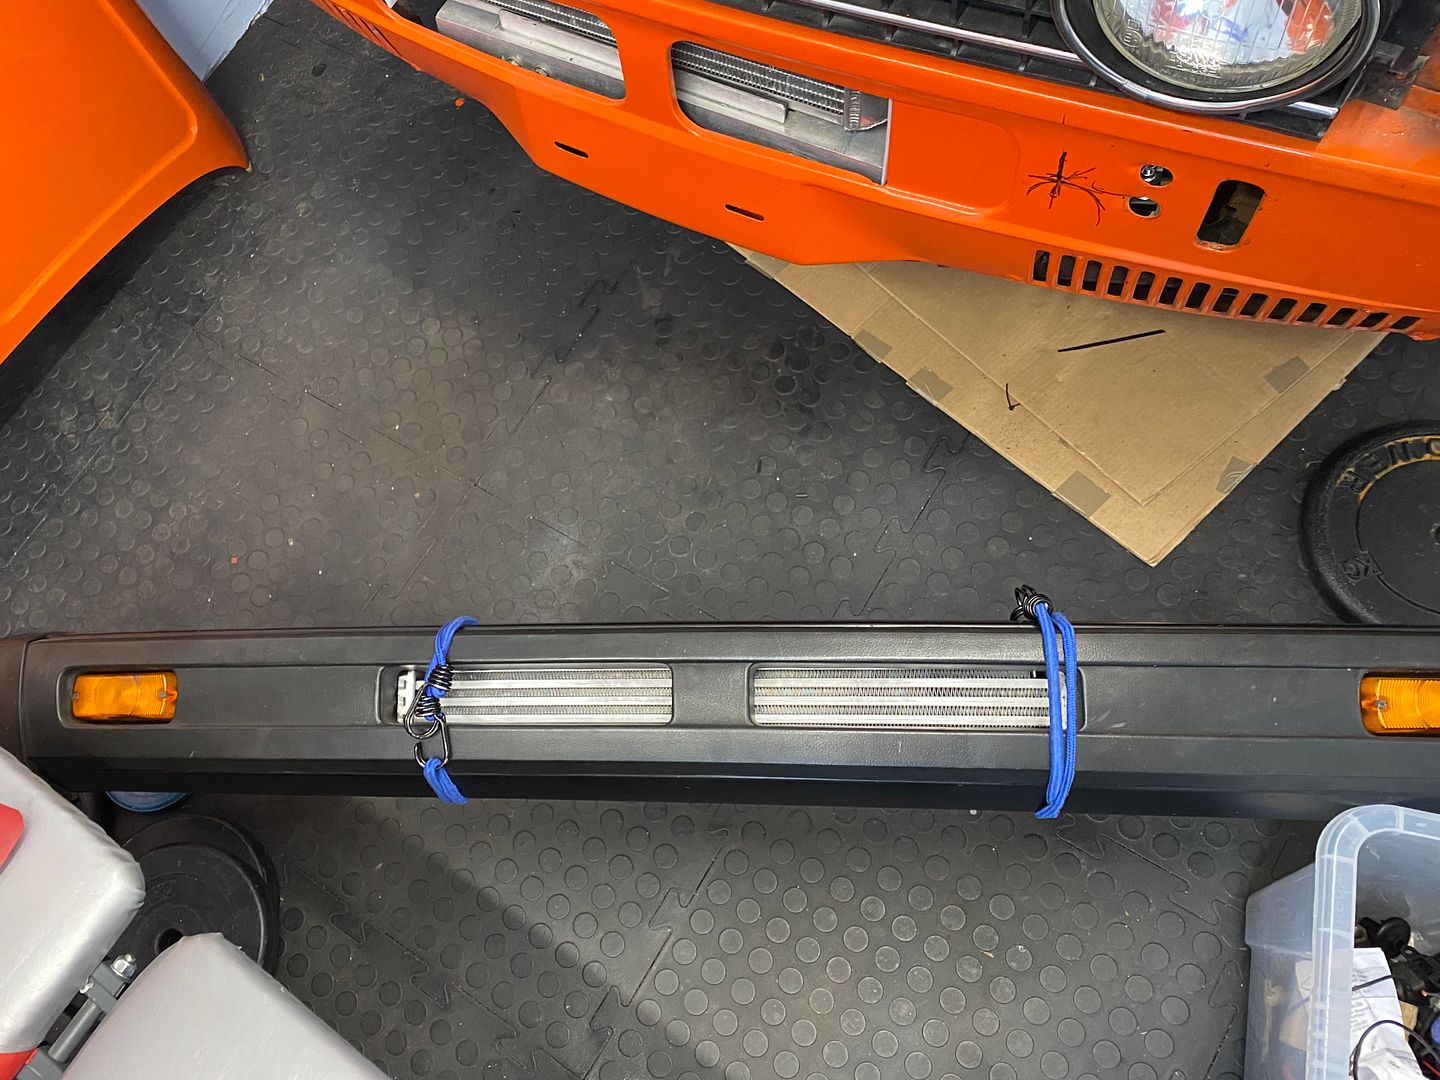 |
|
|
|
Post by swissdave on May 28, 2020 17:24:43 GMT
So today I started the engine for the first time. Pretty much first turn of the key once I'd primed the fuel system. It ran very smoothly, revs nicely and seems pretty good considering the ECU map is just a generic one.
The bad news.. the Rotrex is toast. The bearings screamed like hell and although it was spinning fine and producing air it's had it.
It was very cheap off eBay at a few hundred pounds and it was always a risk but as a new one is £2000 it seemed worth a try. The bracket and belt were only a few pounds and the rest of the EFI conversion is an excellent upgrade in its own right.
I doubt I will be spending that amount on a new one, I will probably go back to a turbo setup but with the benefit of the upgrades I have made to the engine.
The turbo manifold I had I sold to one of our Dutch Daf friends (at a profit) and he has kindly offered to send it back over here so that I can have a copy made. A bespoke hybrid turbo isn't expensive (compared to a new Rotrex) and I've already been down that road so have all the necessary oil fittings etc.
|
|


 Looking good.


